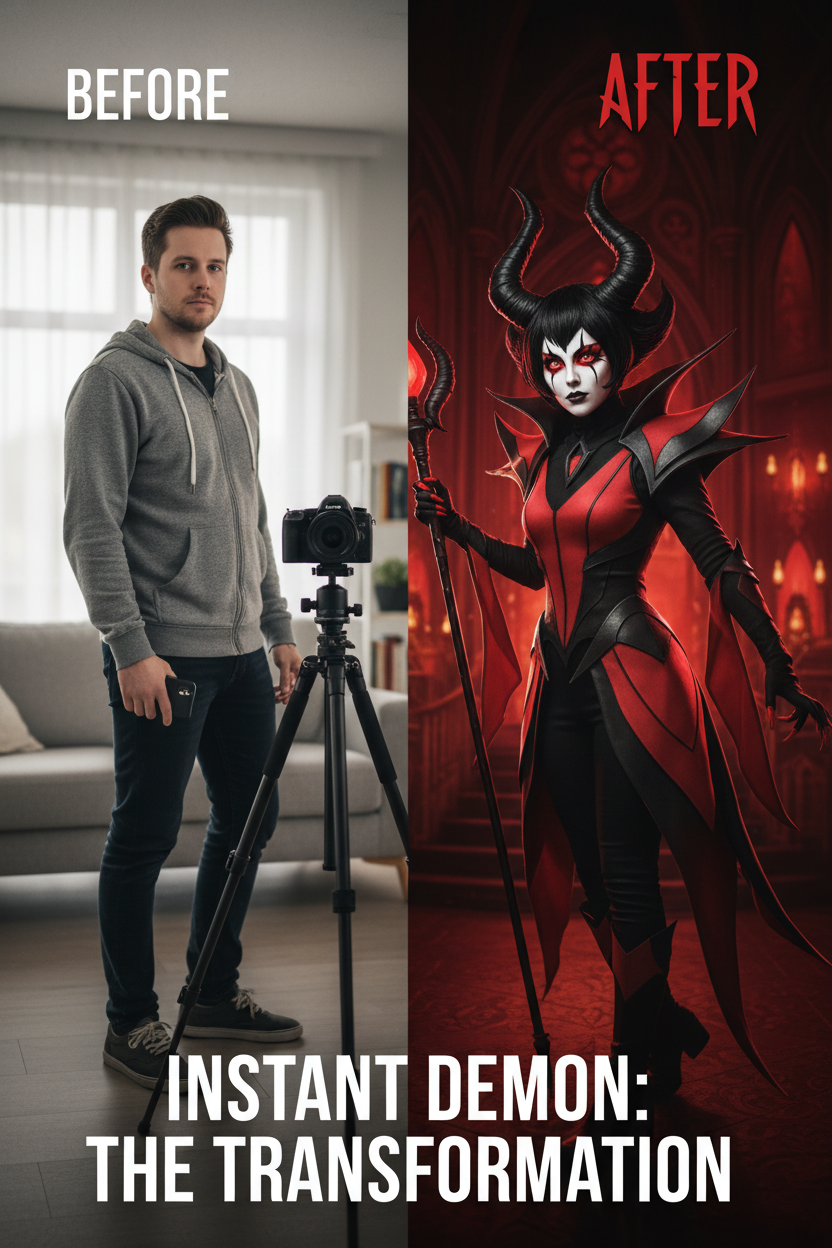
Hazbin Hotel cosplay has become one of the most consistently featured fandoms in "Top 10" cosplay transition compilations on TikTok — the kind of curated, ranked content that only exists once a fandom's fan-made output gets dense enough to be worth cataloging. If you've been watching #HazbinHotel #Ranking #Best #Transition content pile up and want to build your own entry for the next roundup, this guide walks through the full process: picking and building the costume, then actually filming and editing a transition that has a real shot at getting featured.
What you'll need before you start:
- A character choice with a strong, high-contrast color palette (more on why this matters in Step 1)
- Base costume pieces, a wig, and any horn/demonic accessory elements your character needs
- A phone or camera on a stable tripod, and a quiet space with consistent lighting for both your "before" and "after" shots
- A basic video editing app with a cut/transition feature (most popular short-form apps have this built in)
- A clear plan for your transition trigger — the specific movement or sound cue that will mark the cut point
Step 1: Pick Your Character and Build the High-Contrast Demon Aesthetic
Before you touch a camera, the costume itself needs to be built with transition content specifically in mind — not every well-made costume translates well into a transition video, and Hazbin Hotel's cast has a specific visual quality that makes this IP unusually well-suited to the format.
The characters that dominate Hazbin Hotel cosplay transitions compilations tend to share one trait: sharp, saturated color contrast paired with a distinct silhouette — red-and-black color blocking, bold horn or demonic silhouette elements, and eye makeup or contacts that read clearly even in a fast cut. This isn't a coincidence. Transition videos rely on the "after" reveal landing with visual impact in a fraction of a second, and a character built from soft, blended, low-contrast colors simply doesn't deliver that same instant punch that a sharply color-blocked demon-aesthetic design does.
When building your costume, prioritize in this order: silhouette first, since this is what a viewer's eye registers before any fine detail; color blocking second, keeping transitions between colors crisp rather than gradient-blended, since sharp color breaks read more clearly on camera than soft ones; and face-level details last — horns, contacts, sharp eye makeup — since these are what confirm the specific character once the silhouette and color have already done the job of grabbing attention.
For the wig specifically, this is one part of the build worth not skimping on. A dramatic anime character wigs option with bold shape and saturated color holds up far better under fast-cut lighting than a softer, more naturalistic style — Hazbin Hotel's cast in particular relies on hair silhouette as much as color to read correctly, so a wig with real structural shape (not just the right color) matters more here than it would for a softer, more understated character.
For horns, tails, or other demonic accessory elements, sourcing a proper demon & horn cosplay accessories set saves significant build time over DIY sculpting, and — just as importantly for transition content specifically — a properly finished, symmetrical accessory reads cleanly on camera in a way a rough first-attempt DIY piece often doesn't, since transition footage doesn't give viewers time to appreciate handmade character the way a slower, posed photo would.
Step 2: Plan and Film Your Before/After Shots
This is the step most first-time transition creators rush, and it's the one that actually determines whether your final cut looks seamless or sloppy. A convincing transition depends far more on matching your two shots precisely than on any editing trick.
Lock your camera position and framing before filming either shot. Use a tripod or a stable, fixed surface, and mark your standing position on the floor (a piece of tape works fine) so both your "before" (everyday clothes) and "after" (full Hazbin Hotel costume) shots are framed identically — same distance from camera, same angle, same crop. Any mismatch here is the single most common reason transition cuts look obviously edited rather than seamless.
Match your lighting between both shots as closely as possible. Film both the "before" and "after" segments in the same location, ideally back-to-back in the same session, so the lighting conditions haven't shifted. A transition where the lighting noticeably changes between cuts breaks the illusion immediately, even if everything else about the framing is perfect.
Choose a clear, repeatable transition trigger. Most successful cosplay transition trend content uses a specific physical or musical cue to mark the cut — a snap, a spin, a specific beat drop in the audio track. Decide on yours before filming, and perform the same motion in both the "before" and "after" clips at the same point in the frame, since your editing software will use this moment to line up the cut cleanly.
Film several takes of each half. Small inconsistencies — a slightly different pose, a stray hand movement — are much easier to fix by simply filming a few extra takes of each segment than by trying to force a perfect edit out of mismatched footage. Give yourself options rather than committing to your very first take of either shot.
Step 3: Edit the Cut for Maximum Impact
With clean, matched footage from Step 2, the editing process for cosplay transition videos is mostly about pacing and sync rather than complex effects — most popular short-form editing apps have built-in tools specifically designed for this exact cut style.
Sync your transition trigger to a strong beat in your audio. The cut should land exactly on a clear musical or rhythmic accent, not just somewhere in the general vicinity of one. This precision is a big part of what separates a transition that feels satisfying from one that feels slightly off, even to viewers who couldn't articulate why.
Keep the "before" segment short. Most high-performing TikTok cosplay transitions spend only a few seconds establishing the "before" state before cutting to the reveal — viewers are there for the transformation, not an extended setup. A few seconds of clear "before" framing is enough to set up the contrast; longer than that risks losing viewer attention before the payoff even happens.
Let the "after" shot breathe for a beat before ending the clip. Cutting away too quickly right after the reveal undercuts the payoff you just built toward. Give the viewer at least a second or two to actually register the full costume — color, silhouette, and detail — before the video ends or moves to another shot.
Consider a secondary pose or angle change immediately after the cut. A lot of the most-featured transition content doesn't just reveal the costume in the exact same static pose as the "before" shot — a small pose shift, a turn, or a prop reveal immediately after the cut adds a second layer of visual interest that a completely static after-shot doesn't provide.
Troubleshooting: Common Transition Video Pitfalls
"My cut looks obviously edited, not seamless." This almost always traces back to a framing or lighting mismatch between your two shots rather than an editing problem. Go back and check that your camera position, distance, and lighting were genuinely identical between takes — even small shifts are more visible on camera than they seem while filming.
"The transition feels flat even though the costume looks great." This is usually a pacing issue rather than a costume issue — check whether your "before" segment ran too long, whether your transition trigger landed off the beat, or whether you cut away from the "after" shot too quickly for viewers to actually register it.
"My costume looked fine in photos but didn't read clearly in the video." This is exactly the silhouette-and-color-blocking issue covered in Step 1 — costumes built for slow, posed photography don't always translate to fast-cut video the same way. If this happens, look at whether your color transitions are too soft or your silhouette too similar to your everyday clothing silhouette to create real contrast in the cut.
"I can't get my transition trigger to look natural." Practice the specific motion (snap, spin, etc.) several times before filming, and make sure it's a genuinely simple, quick gesture rather than something elaborate — the trigger's job is to mark a clean cut point, not to be its own performance. Overcomplicating it usually makes the transition harder to time correctly, not more impressive.
"My horns/accessories look great in photos but shift or look uneven in motion." Movement-heavy content like transitions puts more stress on accessory security than static photography does. Double-check that any horns, tails, or attached pieces are genuinely secure before filming, since a piece that shifts mid-transition draws attention to the failure rather than the reveal.
Next Steps
Once you've built and filmed one Hazbin Hotel transition, the process gets significantly faster for your next one — you'll already understand how to frame matched shots, time a transition trigger, and build a costume specifically with video performance in mind rather than photography alone. That's a transferable skill set, not a one-time trick specific to this fandom.
If you're aiming to actually land in one of the ongoing Hazbin Hotel cosplay guide-style Top 10 roundups circulating on TikTok, pay attention to what the current top-performing compilations are actually featuring — character variety, specific transition styles, and audio choices all shift over time, and the clips getting picked up for curated content tend to follow recognizable patterns you can study and adapt rather than guess at blindly.

コメントを書く
このサイトはhCaptchaによって保護されており、hCaptchaプライバシーポリシーおよび利用規約が適用されます。