The indie gaming community thrives on creative generosity. When costumers post heartfelt thanks to community designers—such as thanking creators like @Willow for sharing open-source mask templates—it highlights a thriving positive feedback loop: free community resources drastically reduce crafting stress and budget barriers for makers.
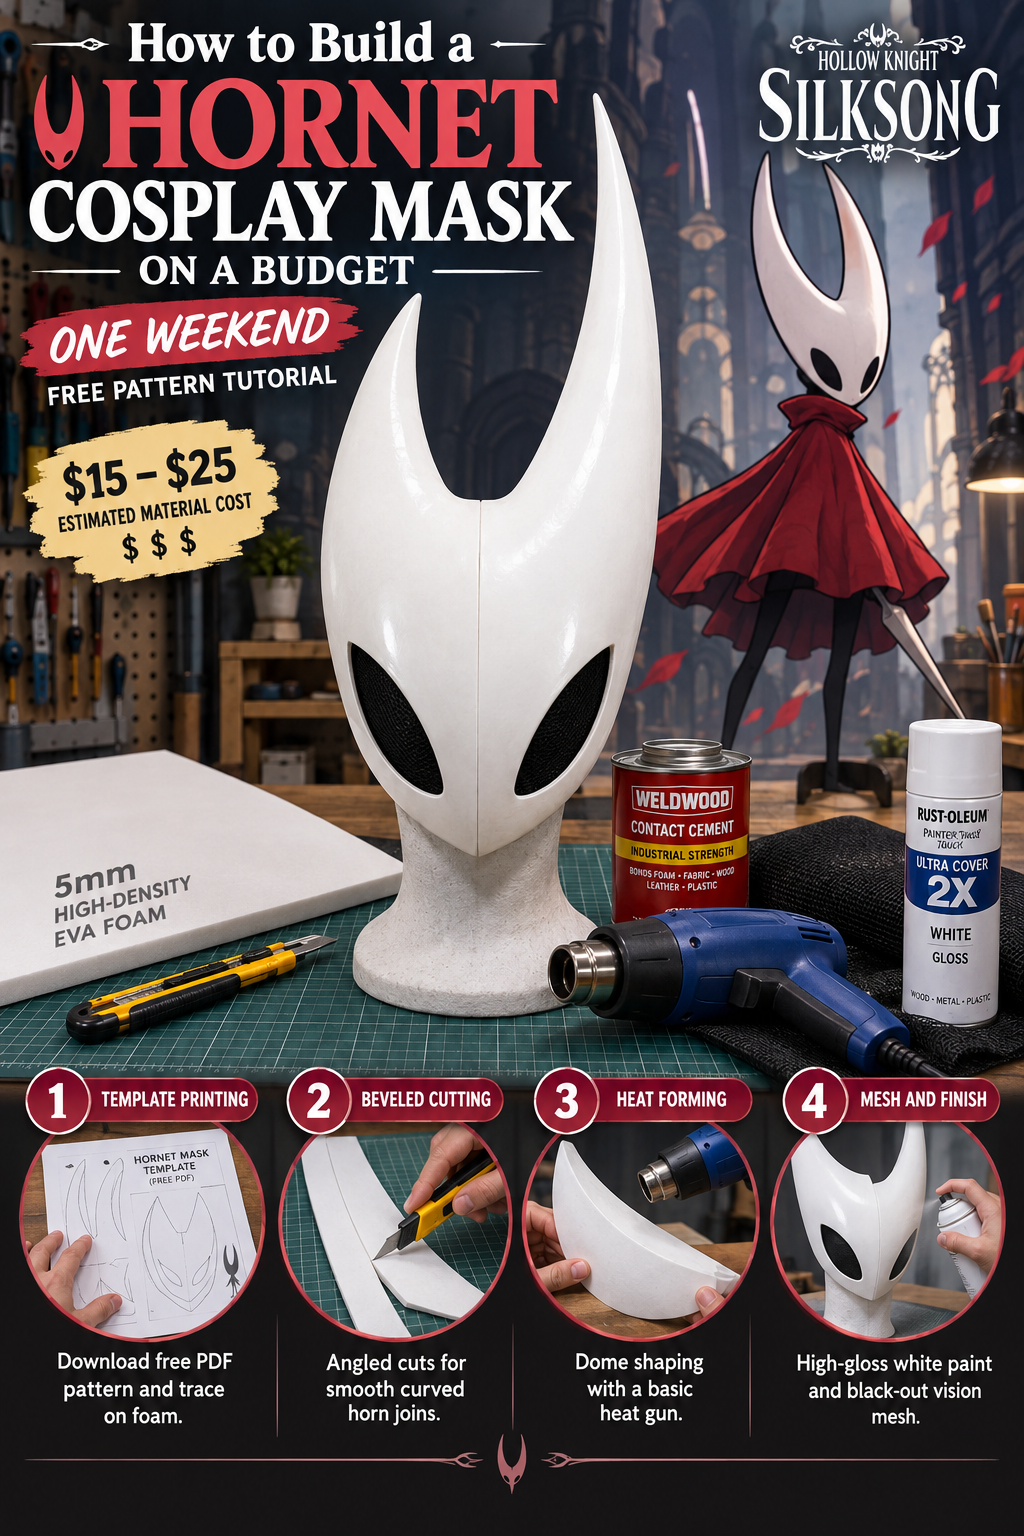
Whether preparing for a convention or celebrating the release of Hollow Knight: Silksong, creating a sleek, screen-accurate Hornet cosplay mask does not require expensive 3D printers or professional vacuum-forming gear. Using high-density EVA foam and a free Hornet cosplay mask pattern, you can craft a seamless, lightweight, and durable helmet in just a single weekend.
                  [ COMMUNITY FOAM CRAFTING WORKFLOW ]
  +-------------------------------------------------------------------+
  | 1. TEMPLATE PRINTING : Download free PDF pattern & trace on foam. |
  | 2. BEVELED CUTTING   : Angled cuts for smooth curved horn joins.  |
  | 3. HEAT FORMING      : Dome shaping with a basic heat gun.        |
  | 4. MESH & FINISH     : High-gloss white paint & black-out vision. |
  +-------------------------------------------------------------------+
Objective & Required Preparation Checklist
-
Tutorial Goal: Construct a lightweight, full-head Hornet mask featuring smooth insectoid curves, large pitch-black eye sockets with full wearer visibility, and a comfortable internal suspension rig.
-
Estimated Time: 4 to 6 hours (spread over 2 days for drying times).
-
Estimated Material Cost: $15 – $25 USD.
| Category | Essential Item / Tool | Purpose in Mask Assembly |
| Base Material | 5mm High-Density EVA Foam (38–45 Shore) | Primary structural shell for horns and faceplate |
| Pattern Source | Printed free cosplay mask templates | Guarantees symmetrical proportions without drafting manually |
| Adhesive | Contact Cement (Barge or Weldwood) | Creates permanent, flexible seam bonds under tension |
| Cutting Tools | Utility knife with fresh razor blades, metal ruler | Ensures clean bevel cuts without foam tearing |
| Visibility & Finish | Black buckram mesh / black sheer tights, flexible primer | Hides wearer's eyes while maintaining clear line-of-sight |
| Crafting Kit | Cosplay mask making supplies (heat gun, sanding dremel) | Shapes curved foam domes and seals cut seams |
Step 1: Download, Scale, and Transfer the Free Mask Pattern
Before cutting into your foam stock, setting up your pattern correctly avoids material waste and ensures a comfortable fit around your skull.
       [ PATTERN TRANSLATION & ALIGNMENT ]
  +-------------------------------------------------+
  | 1. Print PDF on 100% Scale (No Scaling / Fit)   |
  | 2. Measure Test Box (Ensure accurate dimensions)|
  | 3. Trace onto Cardstock -> Transfer to EVA Foam |
  | 4. Mark Dart V-Notches & Alignment Crosshairs   |
  +-------------------------------------------------+
Key Execution Actions
-
Download and Test Print: Grab a community-approved Hornet mask pattern. Print the PDF using "Actual Size" settings (100% scale). Check the 1-inch or 5-cm alignment square on the sheet with a ruler to verify dimensions.
-
Size Adjustment: Hold the paper cutout against your face. If the mask feels too narrow or wide, re-scale your print ratio by 5–10% before cutting foam.
-
Trace Darts & Alignment Registration: Pin the paper template onto your 5mm EVA sheet. Trace the outline using a silver gel pen or ballpoint stylus. Crucially, mark all dart registration crosshairs—these lines guide where the curved seams meet when bonding Hornet's signature sweeping horns.
Step 2: Precision Cutting, Beveling, and Heat-Forming EVA Foam
Hornet's iconic look in Hollow Knight Silksong cosplay depends on crisp edges along the central ridge paired with organic, smooth curves across the mask face.
+-----------------------------------------------------------------------------------+
|                        45-DEGREE BEVEL CUTTING MECHANICS                          |
|                                                                                   |
|    OUTWARD CURVE (Convex)             INWARD SEAM (Concave)                       |
|       /                            \                                              |
|      /  [Blade angled outward]      \  [Blade angled inward]                      |
|     /                                \                                            |
|  Creates tight outer seams         Creates deep internal valley seams             |
+-----------------------------------------------------------------------------------+
Key Execution Actions
-
Execute Angled Bevel Cuts: Hold your utility blade at a 45-degree angle along dart seams. An undercut bevel allows the foam edges to roll inward naturally when glued, producing Hornet's rounded insect shell shape without creating blocky corners.
-
Heat-Form the Dome: Set a heat gun to medium-high heat (300°C / 570°F). Sweep heat evenly across both sides of the foam pieces until the surface turns slightly glossy. While warm, cupped foam pieces over a foam mannequin head or rounded bowl to set a permanent compound curve.
-
Apply Contact Cement: Brush a thin, even layer of contact cement along both joining edges. Allow the adhesive to dry for 5 to 10 minutes until tacky to the touch (not wet). Press the seams together starting from the tip of the horns down to the jawline, applying firm pressure for 30 seconds.
Step 3: Seam Bonding, Surface Priming, and Visibility Mesh Installation
Once the main foam shell is assembled, follow this final pass to achieve a smooth porcelain finish and comfortable interior visibility.
       [ SURFACE PRIMING & MESH INSTALLATION ]
  +-------------------------------------------------+
  | 1. Fill seam micro-gaps with flexible foam clay |
  | 2. Apply 3-4 coats of flexible rubberized primer|
  | 3. Spray semi-gloss bone white acrylic coats    |
  | 4. Hot-glue black mesh behind eye sockets       |
  +-------------------------------------------------+
Key Execution Actions
-
Smooth the Seams: Fill micro-gaps along the central seam line with lightweight acrylic filler or foam clay. Wet your fingertip with water to smooth out transitions before the filler dries.
-
Seal and Paint: Apply 3 to 4 coats of flexible spray primer (such as Plasti-Dip or flexible PVA sealer) to prevent the open-cell foam from soaking up paint. Once cured, spray 2 coats of off-white or porcelain-white acrylic paint.
-
Install Hidden Vision Mesh: Hornet's large black eye cutouts are central to her aesthetic. Cut two patches of black buckram mesh or black sheer stockings slightly larger than the eye openings. Glue the mesh inside the helmet shell using hot glue. This lets you see out with clear visibility while keeping your face completely hidden from outside cameras.
-
Internal Padding: Glue small blocks of high-density upholstery foam or hard-hat suspension pads inside the forehead and crown area to keep the mask centered securely during long convention walks.
Troubleshooting & Crafting Pitfalls to Avoid
Even with a well-designed DIY cosplay mask pattern, beginner builders occasionally encounter seam alignment or finish challenges.
| Common Problem | Root Cause | Prevention & Quick Fix |
| Jagged / Frayed Foam Edges | Dull razor blade tearing through foam layers | Snap off blade segments frequently. A fresh razor edge is required every 4–5 long cuts |
| Visible Seam Gaps | Uneven adhesive drying or pulling edges apart prematurely | Let contact cement dry until completely tacky before pressing. Never join edges while wet |
| Paint Cracking / Flaking | Omitting flexible primer coats on raw EVA foam | Always apply a rubberized base sealer (Plasti-Dip) before applying acrylic spray paints |
| Internal Visor Fogging | Poor airflow inside full-coverage mask | Carve small, hidden ventilation slits along the underside of the jawline or chin seam |
Conclusion & Next Steps
Learning how to make a Hornet mask shows how accessible prop making becomes when creators share open-source templates. By utilizing a free community pattern, precise bevel cuts, and proper heat-forming, you can turn a basic sheet of foam into an impressive piece of gaming artistry.
![5 Easy Cosplay Camera & Makeup Tricks Every Beginner Needs [2026 Edition]](http://www.cosplayreal.com/cdn/shop/articles/cover-5-easy-cosplay-camera-makeup-tricks-2026-cosmo-chainsaw-man-pink-brain-prop-yellow-sweatshirt-five-technique-badges-burst-mode-monofilament-motion-blur-blackout-contour-led-catc.png?v=1790171718&width=1024)

Laisser un commentaire
Ce site est protégé par hCaptcha, et la Politique de confidentialité et les Conditions de service de hCaptcha s’appliquent.