Overview & Selection Criteria
Building a life-sized Fallout T-60 power armor cosplay is one of the most rewarding milestones for any maker. With the ongoing hype surrounding live-action adaptations and convention culture, creators on platforms like TikTok have popularized two distinct construction philosophies: low-cost upcycled hand-crafting versus heavy-duty thermoformed plastic kits.
This guide evaluates both routes based on financial investment, construction complexity, structural durability, and convention comfort to help you decide how to make T-60 power armor cosplay tailored to your timeline, workspace, and budget.
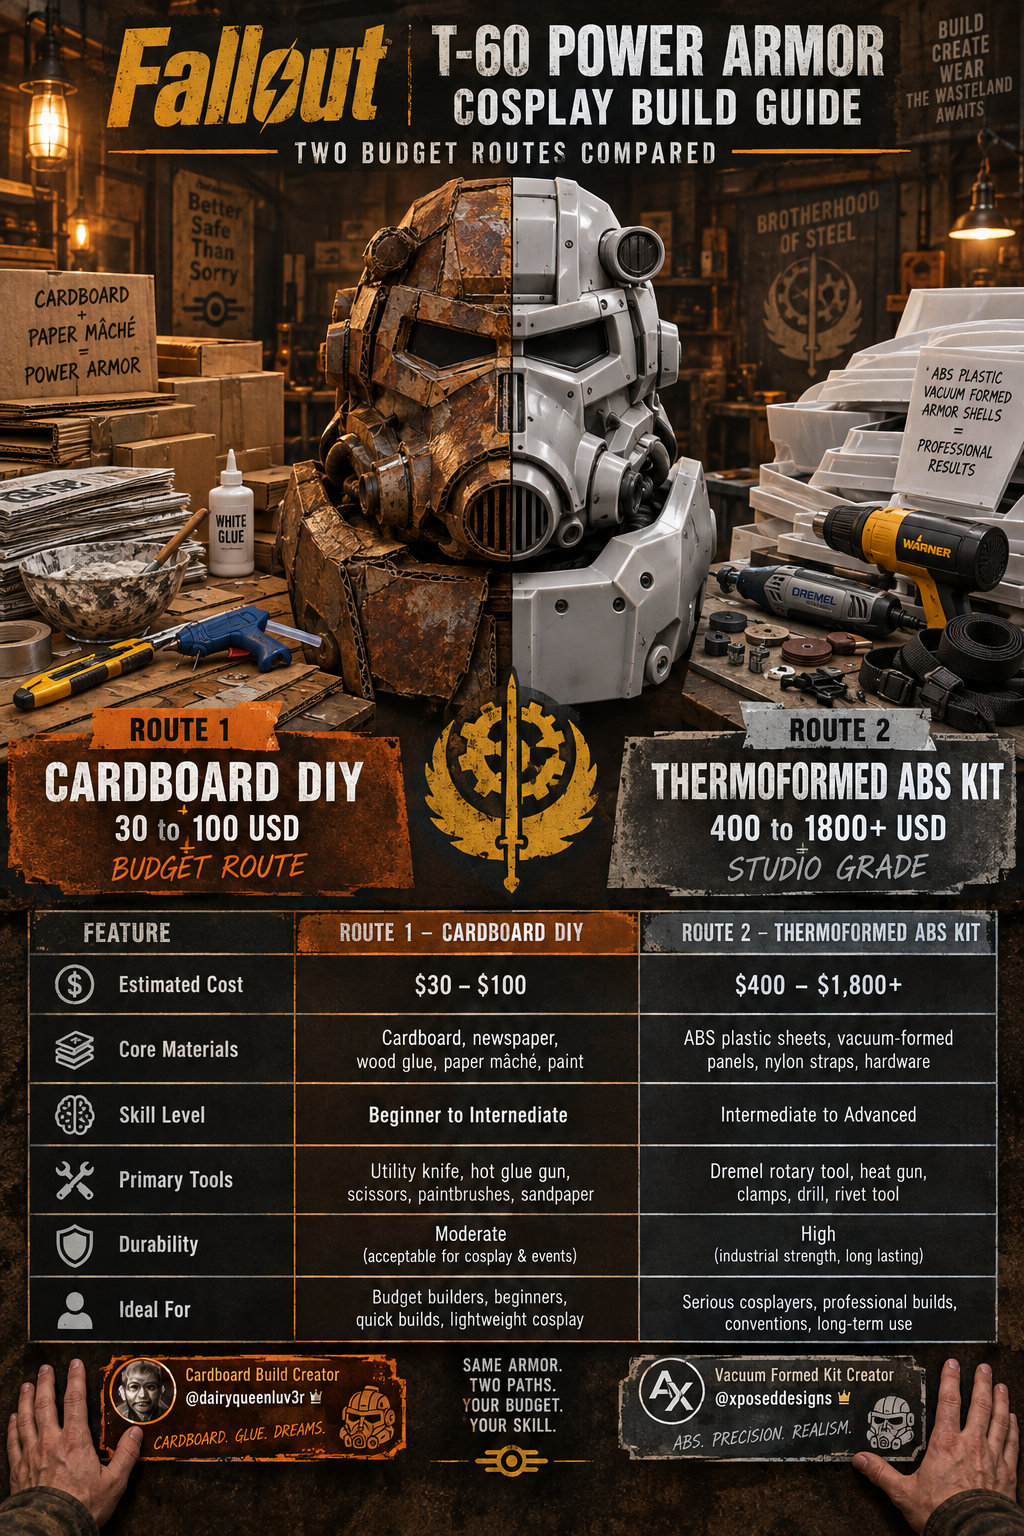
Quick Comparison Matrix
┌──────────────────────────────────────────────────────────────────────────────────────────────────┐
│                           T-60 POWER ARMOR BUILD ROUTES COMPARED                                │
├─────────────────┬───────────────────────────────┬────────────────────────────────────────────────┤
│ Feature Metric  │ 1. Cardboard / DIY Route      │ 2. Thermoformed ABS / Vacuum-Formed Kit Route   │
├─────────────────┼───────────────────────────────┼────────────────────────────────────────────────┤
│ Estimated Cost  │ $30 – $100 USD (Low Budget)   │ $400 – $1,800+ USD (High End / Kit Investment) │
├─────────────────┼───────────────────────────────┼────────────────────────────────────────────────┤
│ Core Materials  │ Corrugated cardboard, hot glue│ Vacuum-formed ABS plastic shells, rivets,      │
│                 │ papier-mâché, EVA foam strips │ webbing harness, automotive paint              │
├─────────────────┼───────────────────────────────┼────────────────────────────────────────────────┤
│ Skill Level     │ Beginner to Intermediate      │ Intermediate to Advanced (Fitting & Finishing) │
├─────────────────┼───────────────────────────────┼────────────────────────────────────────────────┤
│ Primary Tools   │ Utility knife, hot glue gun,  │ Dremel/rotary tool, heat gun, rivet gun,       │
│                 │ paint brushes, sealants       │ spray booth, heavy-duty straps                 │
├─────────────────┼───────────────────────────────┼────────────────────────────────────────────────┤
│ Durability      │ Low to Moderate (Fragile)     │ Extremely High (Impact & Weather Resistant)    │
├─────────────────┼───────────────────────────────┼────────────────────────────────────────────────┤
│ Ideal For       │ First-time builders, budget   │ Long-term convention wear, screen-accuracy,    │
│                 │ makers, photo/video creators  │ troupe cosplayers, troupe photoshoots          │
└─────────────────┴───────────────────────────────┴────────────────────────────────────────────────┘
Stock up on essential adhesives, strapping, and undersuits with our official T-60 power armor cosplay supplies.
1. Cardboard & Upcycled DIY Route — Scratch-Built Budget Crafting
The scratch-built cardboard method represents the pinnacle of budget Fallout power armor cosplay. Popularized by creators like @dairyqueenluv3r—who documented a step-by-step breakdown focusing on constructing the chest plate and helmet base—this approach utilizes readily accessible household packaging materials reinforced with paper clay or resin to create impressive life-sized proportions.
                    [ CARDBOARD BUILD WORKFLOW ]

  [ Patterning & Cutting ] --> Trace Pepakura/2D templates onto flattened cardboard boxes
             │
             v
  [ Hot Glue Assembly ]   --> Structural scoring, folding, and hot glue seam bonding
             │
             v
  [ Surface Hardening ]   --> Wood glue/papier-mâché coating, sanding, and metallic painting
-
Core Features:
-
Uses upcycled corrugated boxes or cereal board as primary structural plating.
-
Follows flat-pattern templates (Pepakura or free PDF blueprints) scaled to user dimensions.
-
Sealed with Mod Podge, wood filler, or diluted PVA glue to smooth out cardboard ridges before priming and dry-brushing metallic rust textures.
-
-
Pros:
-
Ultra-Low Cost: Costs a fraction of raw plastic or high-density foam builds.
-
Accessible Tools: Requires no specialized power tools—just razor blades, measuring tape, and hot glue guns.
-
Lightweight: Considerably lighter to wear during indoor video shoots.
-
-
Cons:
-
Moisture Vulnerability: Rain or heavy humidity can soften unsealed cardboard.
-
Limited Impact Resistance: Prone to denting or tearing in crowded convention halls.
-
-
Target Audience:
-
Beginner prop makers, students on a tight budget, or content creators prioritizing short-form video production over multi-day convention endurance.
-
2. Thermoformed ABS / Vacuum-Formed Kit Route — Studio-Grade Precision
For makers aiming for movie-prop accuracy, the heat formed power armor route offers a rugged, wearable armor suit. Popularized by specialist workshops like @xposeddesigns (showcasing vacuum-formed full-body T-60 kits on xposeddesigns.com), this method utilizes rigid ABS plastic shells engineered to withstand rigorous convention environments and long-term display.
                  [ THERMOFORMED KIT WORKFLOW ]

  [ Shell Trimming ]      --> Rotary tool trimming of excess ABS flash plastic edges
             │
             v
  [ Hardware Rigging ]    --> Internal webbing straps, aluminum brackets, and quick-release buckles
             │
             v
  [ Paint & Weathering ]  --> Plastic primer base, industrial lacquer coats, and acrylic wash grime
-
Core Features:
-
Pre-molded heavy-gauge ABS plastic shells formed over high-accuracy 3D sculpture molds.
-
Includes crisp recessed mechanical details, rivet points, and realistic armor plate thickness.
-
Assembled using internal nylon strapping rigs, quick-release side-buckles, and industrial rivets.
-
-
Pros:
-
Screen-Accurate Aesthetics: Delivers sharp lines, smooth curved bevels, and authentic heavy industrial plating.
-
Extreme Durability: Weatherproof, scratch-resistant, and capable of enduring crowded convention floors.
-
Faster Build Timeline: Eliminates hundreds of hours spent cutting and carving individual foam or paper plates.
-
-
Cons:
-
High Upfront Financial Investment: Full armor shell kits range from several hundred to over a thousand dollars.
-
Requires Power Tools: Needs rotary tools (Dremel), sanding drums, heat guns, and ventilation for painting.
-
-
Target Audience:
-
Veteran makers, convention competition entrants, and dedicated franchise fans seeking a long-lasting Fallout cosplay build ready for major events.
-
How to Choose Your T-60 Power Armor Build Route
When deciding on cardboard vs heat formed power armor, evaluate your build parameters across three key categories:
┌────────────────────────────────────────────────────────────────────────┐
│                        DECISION MATRIX GUIDE                           │
├─────────────────┬──────────────────────────────────────────────────────┤
│ Choose          │ • You have a sub-$100 budget.                        │
│ Cardboard DIY   │ • You lack a dedicated workshop/power tools.         │
│ If...           │ • Your main goal is social media content or short    │
│                 │   photoshoots.                                       │
├─────────────────┼──────────────────────────────────────────────────────┤
│ Choose          │ • You want maximum durability for multi-day cons.    │
│ Thermoformed    │ • You have access to rotary tools and safety gear.   │
│ Kits If...      │ • You want screen-accurate mechanical proportions.   │
└─────────────────┴──────────────────────────────────────────────────────┘
-
Evaluate Your Workspace & Equipment: Cardboard builds can be crafted on a bedroom desk with basic hand tools. Thermoformed ABS kits require adequate ventilation for trimming dust and aerosol painting.
-
Consider Your Convention Schedule: If you plan on wearing your suit through crowded halls for 8+ hours, rigid thermoformed ABS withstands bumps and weather far better than paper-based composites.
-
Hybrid Alternatives: Many cosplayers choose a middle ground—using a vacuum-formed helmet for detailed headware while building the torso armor out of EVA foam or reinforced cardboard.
Conclusion & Material Sourcing
Whether you opt for an upcycled scratch build or invest in a vacuum-formed ABS kit, creating a T-60 power armor suit is a project that showcases incredible maker craftsmanship. Check out our step-by-step DIY T-60 power armor tutorial or review our T-60 power armor tutorial for full blueprint downloads and strapping rigging diagrams.

Laisser un commentaire
Ce site est protégé par hCaptcha, et la Politique de confidentialité et les Conditions de service de hCaptcha s’appliquent.