Introduction: Tutorial Goal & Preparation Toolkit
Creating a high-impact costume from Clair Obscur: Expedition 33 requires translating post-apocalyptic turn-based fantasy aesthetics into wearable, convention-safe builds. Whether you are assembling a low budget Lune cosplay for major convention circuits like Fan Expo Toronto, Brazil Game Show, or Lucca Comics & Games, mastering this character group relies on smart textile substitution, 3D pattern sourcing, and optical illusion mechanics.
Grounded in prop engineering literature and costume design frameworks, executing levitating gear relies on structural leverage and refraction tricks (Entwistle, The Fashioned Body; Hebdige, Subculture). High-density polyethylene (HDPE) harnesses paired with clear polycarbonate support rods maintain an ultra-low refractive index ($\approx 1.58$), giving props the illusion of floating under convention lighting.
Assemble these essential workshop supplies before beginning your build:
-
Materials & Synthetics: 2mm to 6mm high-density EVA foam sheets, clear polycarbonate acrylic rods (6mm–10mm diameter), heavy canvas, and faux leather yardage.
-
Hardware & Harnesses: Clear monofilament nylon line (50lb+ test rating), adjustable nylon webbing straps, quick-release side-buckles, and 3D printing filament (PLA+ or PETG).
-
Crafting Tools: Heat gun (100°C–150°C setting), contact cement, rotary tool (Dremel), acrylic paints, and a sewing machine with heavy-duty needles.
-
Specialized Sourcing: Expedition 33 cosplay patterns and DIY costume supplies.
Step 1: Crafting Budget Lune Garments & Expedition Armbands
Direct Answer: Learning how to make a budget Lune cosplay requires sourcing thrifted linen base garments, applying acrylic fabric dye washes for worn distressing, and building a modular Expedition 33 cosplay armband out of heat-shaped 4mm EVA foam.
                     +---------------------------------------+
                     | LUNE & EXPEDITION BUILD PIPELINE      |
                     +---------------------------------------+
                                         |
               +-------------------------+-------------------------+
               v                                                   v
  [ 1. Budget Garment Distressing ]                     [ 2. Expedition Armband Assembly ]
  - Dye thrifted linen/canvas base layers                - Trace template onto 4mm EVA foam
  - Rasp hem edges for turn-based survival wear         - Heat-shape curvature & apply faux rivets
               |                                                   |
               +-------------------------+-------------------------+
                                         v
                     +---------------------------------------+
                     | 3. Optical Floating Prop Rigging      |
                     - Anchor clear acrylic rod to back harness|
                     - Balance light orb prop on cantilever   |
                     +---------------------------------------+
Executing Garment and Armband Construction
-
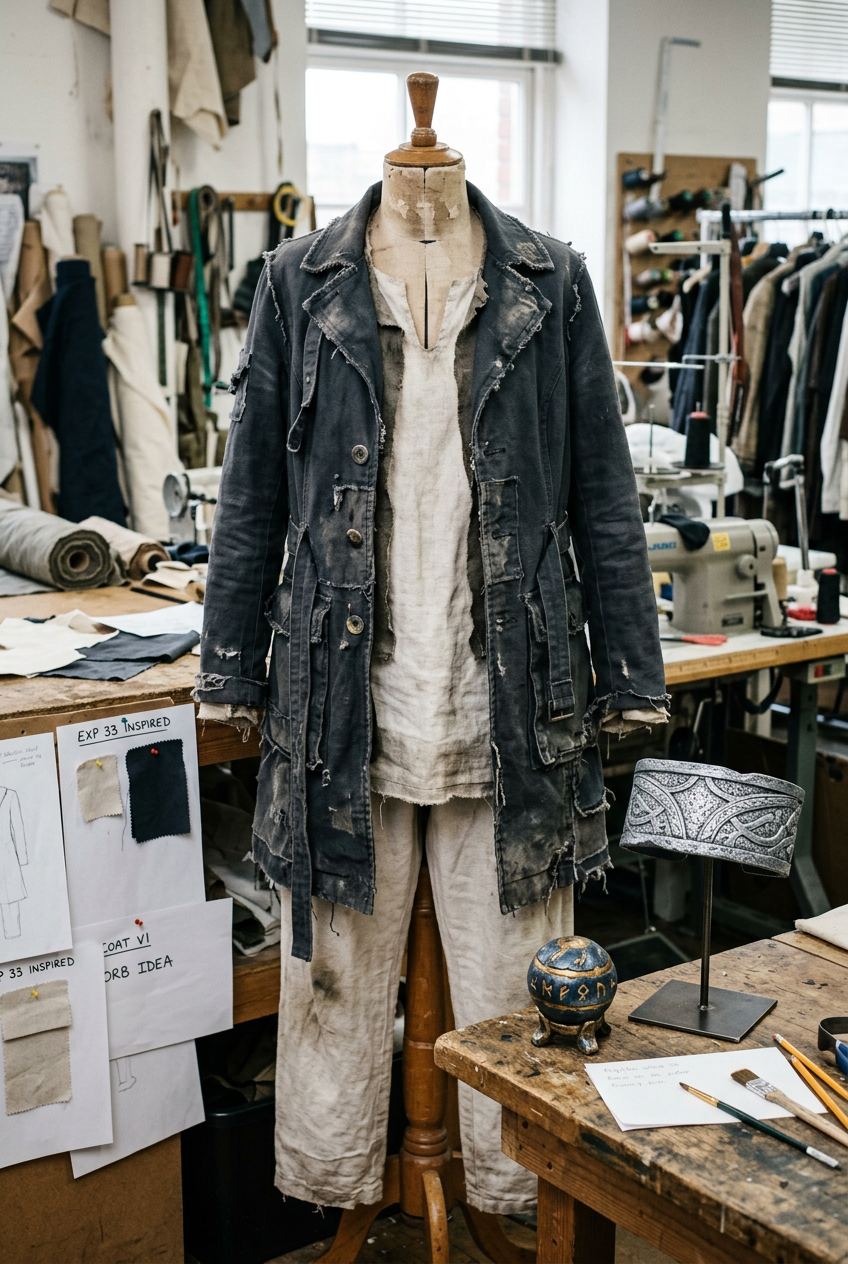
Patterning the Base Layers: Follow a Lune cosplay tutorial or unpick basic tunic patterns to draft the layered jacket and trousers. Use affordable canvas or cotton blends instead of expensive real leather.
-
Fabric Distressing: Submerge sewn fabric panels in diluted brown and black acrylic washes. Use a wire brush to rasp hem edges, creating the weathered look of expeditionary survival gear.
-
Drafting an Expedition 33 cosplay armband pattern****: Trace the faction insignia onto a 4mm EVA foam sheet. Bevel the outer borders with a rotary tool at a 45-degree angle.
-
Heat-Forming and Painting: Curve the foam armband around your forearm using a heat gun set to 100°C. Prime the foam with two coats of flexible rubber sealant, spray a silver metallic base, and apply a black wash into the carved grooves to highlight weathered metal details.
Step 2: Engineering the Anti-Gravity Floating Prop Rig
Direct Answer: Master how to create a floating prop for cosplay by anchoring a hollow, lightweight foam or 3D-printed orb to a transparent 8mm polycarbonate rod that extends from a concealed back harness hidden beneath your jacket.
┌────────────────────────────────────────────────────────────────────────┐
│                   FLOATING PROP INTEGRATION MATRIX                     │
├───────────────────────┬────────────────────────────────────────────────┤
│ Structural Component  │ Engineering Specification & Material           │
├───────────────────────┼────────────────────────────────────────────────┤
│ Concealed Harness     │ High-density chest/back harness made from      │
│                       │ 6mm EVA foam and 1-inch nylon webbing straps.   │
├───────────────────────┼────────────────────────────────────────────────┤
│ Support Cantilever    │ 8mm clear solid polycarbonate acrylic rod with │
│                       │ an aluminum sleeve socket attached to harness. │
├───────────────────────┼────────────────────────────────────────────────┤
│ Levitating Prop Body  │ Ultra-light hollow EVA foam or 3D-printed shell │
│                       │ (under 300g) painted with glowing accents.     │
└───────────────────────┴────────────────────────────────────────────────┘
Executing the Levitating Mechanism
-
Build the Internal Harness: Construct a rigid upper-back plate using 6mm EVA foam lined with nylon webbing straps. Secure the harness tightly across your chest beneath Lune's outer tunic.
-
Mount the Cantilever Socket: Bolt a lightweight aluminum tube socket onto the back plate at a 45-degree upward angle.
-
Prepare the Polycarbonate Rod: Insert a clear 8mm polycarbonate rod into the socket. Bend the rod slightly using controlled heat from a heat gun to position the mounting point 6 to 10 inches away from your shoulder or palm.
-
Attach the Light Prop Body: Secure a hollow, light-weight orb or relic prop to the end of the clear rod. The structural stiffness of polycarbonate holds the prop steady, creating a clean anti-gravity effect for photos without visible support wires.
Step 3: Pattern Sourcing and Sewing Main Party Costumes (Maelle, Sciel & Verso)
Direct Answer: Building complex party outfits like Maelle or Sciel is simplified by using a digital Maelle cosplay costume pattern tutorial, sourcing 3D printable STL files for gear, and structuring layered coats with interfacing.
Executing Party Outfit Assembly
-
Digital Pattern Sourcing: Utilize verified community patterns for jacket construction, leather armor templates, and boot-cover patterns.
-
Tailoring Structural Jackets: Coat garments for characters like Maelle require crisp lines. Fuse medium-weight interfacing to interior lining panels to prevent soft fabrics from collapsing under heavy shoulder armor.
-
Integrating Props and Hardware: Secure foam or 3D-printed pauldrons, hip bags, and belt buckles directly to structural belts using Chicago screws or heavy-duty snap fasteners rather than hot glue.
Troubleshooting & Workshop Safety Precautions
-
Issue 1: The Floating Prop sags or bounces during walking.
-
Correction: The prop shell is too heavy or the acrylic rod is too thin. Keep the floating orb weight under 300 grams (10.5 oz) by building with 2mm EVA foam, and upgrade to a stiffer 10mm solid polycarbonate rod.
-
-
Issue 2: Clear Polycarbonate Rod reflects bright flash photo lights.
-
Correction: Spray the clear rod with a light coat of matte clear sealant, or position the mounting rod directly behind your arm or torso relative to the main camera angle.
-
-
Issue 3: Foam Armbands slip down sleeves.
-
Correction: Glue a strip of textured rubber shelf liner or a strip of velcro to the interior face of the armband to grip your jacket sleeve securely.
-
Conclusion & Next Steps
Executing a comprehensive Clair Obscur Expedition 33 cosplay guide build is achievable when combining smart budget materials with clever optical engineering. By crafting light foam armbands, using clear cantilever rods for levitating props, and following structured sewing patterns, you can bring the heroes of Expedition 33 to life. Equip your workshop today with our collection of Expedition 33 cosplay patterns and DIY costume supplies!


Laisser un commentaire
Ce site est protégé par hCaptcha, et la Politique de confidentialité et les Conditions de service de hCaptcha s’appliquent.