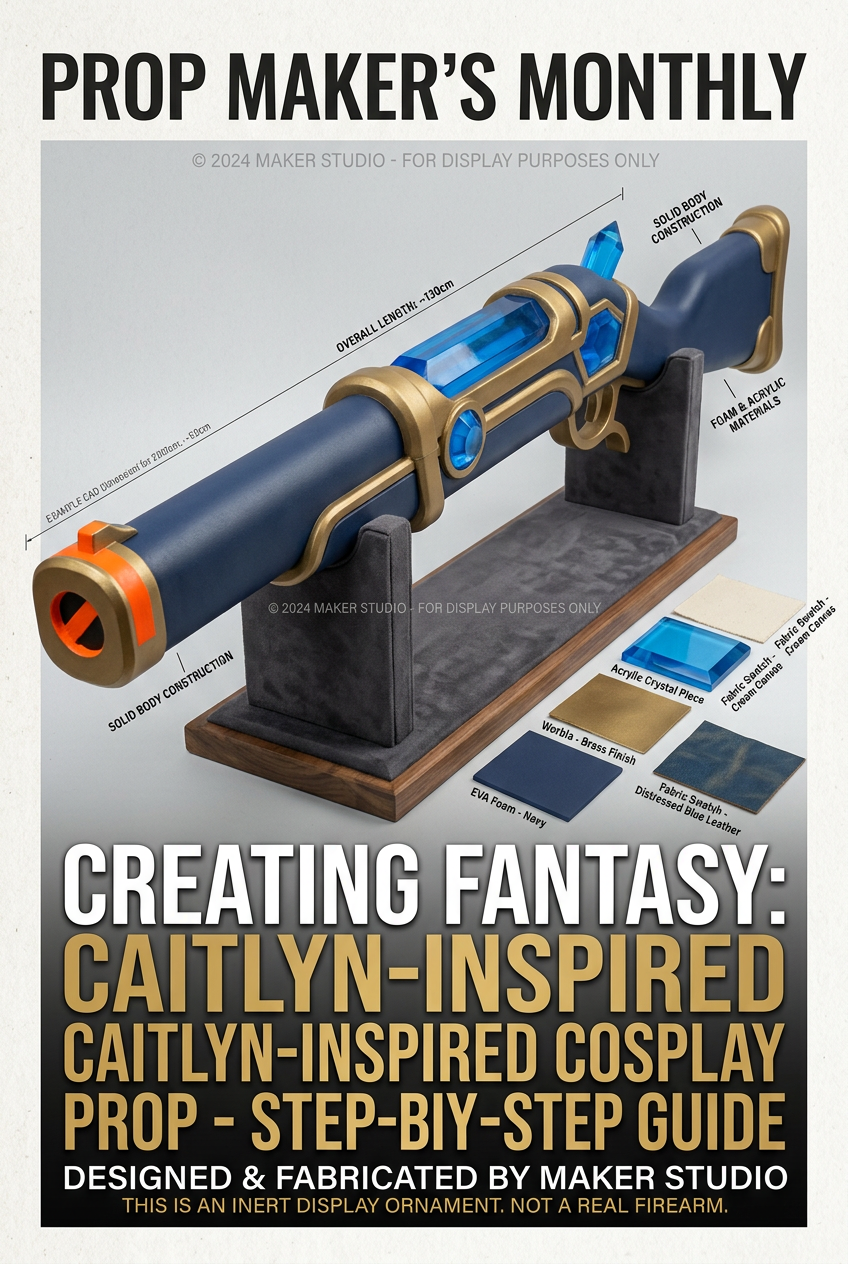
Introduction: Mastering Massive 3D-Printed Weapon Props
Recreating Commander Caitlyn Kiramman's hextech repeater rifle from Arcane Season 2 is one of the most rewarding challenges for hardcore prop makers. Reaching well over 4 feet in length, this prop requires a full fabrication pipeline—moving from complex 3D CAD modeling and multi-part slicing to heavy post-processing, structural welding, and multi-layered metallic weathering.
As recorded in viral Maker tutorials across TikTok, taking an oversized weapon prop from digital files to a floor-ready masterpiece demands proper planning. Following a structured Caitlyn cosplay prop tutorial ensures your large-scale 3D printed cosplay props maintain structural integrity while looking screen-accurate under convention hall lights.
Before launching your fabrication workflow, assemble your workshop gear and 3D printing supplies for cosplay props:
-
CAD & Printing Gear: FDM 3D printer (e.g., Ender 3 or Bambu Lab), PLA/PETG filament spools, and a $1/2\text{-inch}$ hollow aluminum rod or carbon fiber dowel for internal core support.
-
Bonding & Bodyshopping: Cyanoacrylate (super glue) with spray activator, 2-part epoxy resin, Bondo glazing putty, and Rust-Oleum filler primer spray cans.
-
Finishing & Abrasives: 120, 240, 400, and 800-grit sandpapers, sanding block, and a rotary tool (Dremel) with grinding bits.
-
Paints & Metallics: Matte black primer, metallic brass/gold acrylics, gunmetal spray paint, shading washes (Nuln Oil or black oil paint), and matte clear coat.
Step 1: 3D Modeling, Slicing & Internal Core Channeling
Oversized prop rifles cannot be printed in a single piece on standard print beds. They must be sliced strategically while incorporating internal structural reinforcement.
-
Model or Source CAD Files: Model the rifle in software like Fusion 360 or Blender, breaking the design into modular components (stock, main receiver, barrel shroud, scope, and trigger mechanism). Ensure the Arcane Caitlyn sniper rifle prop model accounts for key features like the hexagonal barrel shroud and mechanical sight attachments.
-
Create an Internal Core Channel: Boolean a continuous $1/2\text{-inch}$ cylindrical hole straight through the center axis of the stock, body receiver, and barrel shroud. Inserting an aluminum rod or carbon fiber pipe through this channel prevents 3D prints from snapping along horizontal layer lines when held horizontally.
-
Slice with Alignment Pegs: Split large sections into 150mm–200mm tall segments to fit your print bed. Model $4\text{mm}$ alignment key holes along connection faces to ensure perfect alignment during assembly.
-
Optimize Print Settings: Print in PLA or PETG with 3–4 wall perimeters and 15%–20% gyroid infill. Gyroid infill delivers maximum multidirectional strength while keeping the total prop weight manageable for long convention days.
Step 2: Post-Processing, Assembly & Seamless Welding
Eliminating 3D print layer lines and hiding seam cuts is the difference between a raw plastic toy and a realistic movie prop.
-
Initial Heavy Sanding: Dry-sand all individual printed parts using 120-grit sandpaper to knock down high ridges, blobs, and z-seams.
-
Assemble Along the Core Rod: Slide the printed parts onto your cut aluminum core rod, bonding connection faces with 2-part epoxy and cyanoacrylate glue paired with spray activator. Clamp the entire assembly tightly until fully cured.
-
Weld Seams & Apply Glazing Putty: Use a 3D printing pen or soldering iron on low heat to "plastic weld" outer seam lines together. Spread a thin layer of 3M Bondo glazing putty or scratch filler over connection seams and deep layer lines.
-
Apply Filler Primer & Wet-Sand: Spray the entire prop with a heavy coat of sandable filler primer. Once dry, sand with 240-grit, re-apply primer, and finish with a wet 400-grit pass until the surface feels completely smooth.
Step 3: Layered Weathering, Brass Metallics & Hextech Detailing
Arcane's visual style combines Piltover's refined steampunk elegance with worn, battle-tested textures.
-
Lay a Dark Metallic Basecoat: Spray the entire prop with a base coat of satin black or dark gunmetal. This creates dark shadows in crevices and acts as a foundation for chipping effects.
-
Apply Piltover Brass & Steel Layers: Mask off handle grips and Hextech accent zones. Hand-paint or airbrush metallic gold/brass paint onto the ornate receiver trims and scope housing. Dry-brush bright silver acrylic along high-wear edges (trigger guard, stock end, barrel tip) to simulate worn metal revealing bare steel under the paint.
-
Weather with Oil Washes: Dilute dark brown and black oil paint with mineral spirits to create a runny wash. Slather the wash into recessed engravings, screw heads, and seam lines, wiping away excess with a shop towel. This leaves dark grime in crevices, giving the rifle real weight and age.
-
Seal and Install Hextech Gems: Seal the paint job with a matte clear coat spray to protect it from scratches during floor handling. Finish by embedding translucent blue resin or LED-lit acrylic gems into the scope and power chamber to complete the Piltover Hextech aesthetic.
Troubleshooting & Pro Prop-Building Pitfalls
-
Prop Snapping at the Receiver Seam: High-stress joints (where the barrel meets the heavy stock) will break if held together only with surface glue. Always run a continuous metal or fiberglass rod through the core rather than relying on plastic alignment pegs alone.
-
Filler Primer Cracking or Peeling: Applying thick coats of filler primer in cold or humid conditions causes paint sagging and cracking. Spray thin, light coats in a well-ventilated space between $65^\circ\text{F}$ and $80^\circ\text{F}$ ($18^\circ\text{C}$–$26^\circ\text{C}$), waiting 15 minutes between passes.
-
Failing Convention Peace-Bonding Inspection: Large sniper rifles can be flagged at security gates if barrel tips look too realistic. Check event weapon policies in advance and attach a removable, high-visibility orange safety cap over the muzzle during transit through venue public areas.
Conclusion & Next Steps
Building a screen-accurate Caitlyn sniper rifle takes patience, precise 3D slicing, and layered weathering. By reinforcing your internal channels with a metal rod, thoroughly filling print layer lines, and applying hand-painted grime washes, you can turn raw plastic filament into an award-worthy prop. Stock up on high-grade 3D printing supplies for cosplay props to launch your next build today!


Laisser un commentaire
Ce site est protégé par hCaptcha, et la Politique de confidentialité et les Conditions de service de hCaptcha s’appliquent.