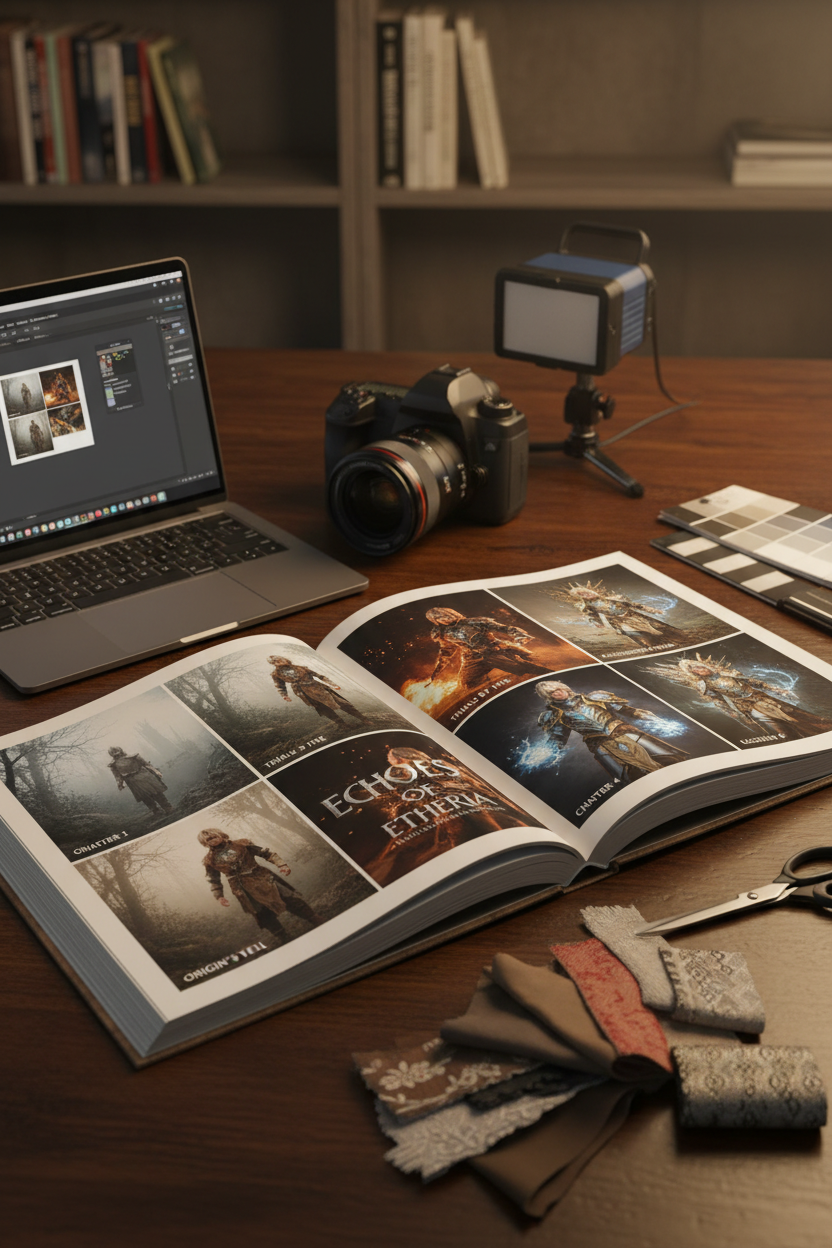
Transforming cosplay photography from single, quick-scroll social media posts into a physical, magazine-quality cosplay photo book allows creators to tell complete character stories. Instead of relying on one-off viral impressions, building a narrative cosplay visual storytelling project documents a character's journey across distinct narrative chapters.
Pre-Production Checklist & Required Tools
Before starting your self-published cosplay photobook, gather these core project planning assets:
-
Narrative Outline & Shot List: A chapter-by-chapter script mapping the character's emotional arc.
-
Photography & Lighting Gear: High-resolution camera body (24MP+ recommended for print DPI), versatile prime lenses, and portable strobes.
-
Wardrobe Variations: Sequential outfits or themed cosplay costume sets reflecting different eras or emotional states of the character.
-
Layout Design Software: Adobe InDesign, Affinity Publisher, or Canva set to CMYK color mode.
-
Print-on-Demand (POD) Platform: Blurb, Mixbook, or a trusted local digital press for physical fulfillment.
Step 1: Map the Character Arc and Shot List
A narrative photobook differs from a simple photo album by following a clear storytelling framework rather than a random collection of images.
                      [ NARRATIVE PHOTOBOOK STRUCTURE ]
                                     │
     ┌───────────────────┬───────────┴───────────┬───────────────────┐
     ▼                   ▼                       ▼                   ▼
Chapter 1: Origin   Chapter 2: Trial       Chapter 3: Climax   Chapter 4: Legacy
- Rural/Low-key     - Intense lighting     - High-contrast     - Majestic posing
- Muted wardrobe    - Battle weathering    - Full armor/effects - Editorial spread
-
Define Chapter Milestones: Divide your character's storyline into 3–5 distinct chapters (e.g., origin, rising conflict, peak transformation, and epilogue).
-
Draft a Visual Script: Assign specific camera angles, expressions, and lighting moods to each chapter. Alternate between wide environment shots, medium action poses, and intimate macro details.
-
Calculate Page Allocation: Plan for 24 to 48 total pages, assigning spread layouts (two facing pages) to major plot points to maintain rhythm.
Step 2: Execute Multi-Location Shoots and Wardrobe Shifts
Executing compelling character storytelling photography requires matching real-world locations and costumes to the character's progression.
-
Match Environments to Story Eras: Transition location choices along with the narrative arc (e.g., starting in natural, muted outdoor spaces before moving into grand indoor sets or gritty urban ruins).
-
Coordinate Costume Evolution: Use distinct variations or modular adjustments across your themed cosplay costume sets—such as adding battle damage, weathering, or changing props—to visually signal growth between chapters.
-
Capture Editorial Fillers: Shoot texture details (close-ups of fabric weave, prop hilts, footsteps, or atmospheric landscapes) to use as background fills and page dividers during layout design.
Step 3: Design Editorial Layouts and Typography
To make your project look like a professional art magazine rather than a printed family album, apply clean graphic design principles.
| Design Element | Amateur Photobook | Professional Editorial Layout |
| Grid Alignment | Random placement, inconsistent margins | Strict 3-column or 4-column grid framework |
| Image Spacing | Edge-to-edge clutter on every page | Generous white space and deliberate empty margins |
| Typography | Generic system fonts, heavy drop shadows | Clean serif/sans-serif pairings with subtle tracking |
| Page Hierarchy | Equal image sizing across spreads | 1 dominant hero shot supported by 2–3 smaller details |
-
Set Up Print Bleed & Margins: Establish a 0.125-inch trim bleed and keep all critical visual elements inside a safe margin area.
-
Pair High-Impact Spreads: Place dynamic double-page hero shots next to minimalist text quotes or subtle lore excerpts.
-
Maintain Visual Rhythm: Avoid clustering high-energy action shots consecutively; alternate intense battle pages with quiet, atmospheric spreads to give the reader visual breathing room.
Step 4: Prepare File Exports and Self-Publish Print Runs
Converting digital RGB photos into physical ink on paper requires careful technical preparation to avoid color shifting or cropped details.
-
Convert to CMYK Color Space: Convert all final images from sRGB to CMYK (using SWOP or GRACoL color profiles) and adjust black point levels to prevent crushed shadows in physical printing.
-
Export at 300 DPI: Export your final layout as a press-ready PDF with printer crop marks enabled and all fonts embedded.
-
Select Paper Stock and Binding: Opt for 100lb+ coated luster or matte paper to prevent ink bleed. Choose layflat binding for full-bleed double-page spreads so key subject details are not lost inside the book spine.
Troubleshooting Common Photobook Pitfalls
Problem 1: Images Appear Darker and Muddy in Print
-
Cause: Editing on an uncalibrated, overly bright monitor using RGB space without soft-proofing for ink absorption.
-
Solution: Calibrate your monitor display brightness to 80–100 cd/m² and run a single test proof copy with your printer before committing to a full production run.
Problem 2: Crucial Subject Details Clipped by the Spine
-
Cause: Placing important visual elements directly across the center fold gutter without layflat binding.
-
Solution: Keep faces, logos, and critical prop details at least 0.5 inches away from the center fold line, or upgrade to a seamless layflat binding option.
Problem 3: Disjointed Visual Style Across Chapters
-
Cause: Inconsistent post-processing color grades across different shoot days.
-
Solution: Develop a unified color-grading LUT (Look-Up Table) or Lightroom preset stack for the entire project to maintain cohesive color balance across all chapters.
Bringing Your Story to Print
Creating a narrative-driven cosplay photo book bridges the gap between digital content creation and physical art collection. By treating your next project as a structured editorial publication—from early shot-list scripting to final print proofing—you preserve your craftsmanship in a permanent, high-value format.
Ready to plan your next character story? Explore our multi-era themed cosplay costume sets to outfit your character's progression, or check out our guide on Visual Storytelling Techniques in Cosplay Photography.

Dejar un comentario
Este sitio está protegido por hCaptcha y se aplican la Política de privacidad de hCaptcha y los Términos del servicio.