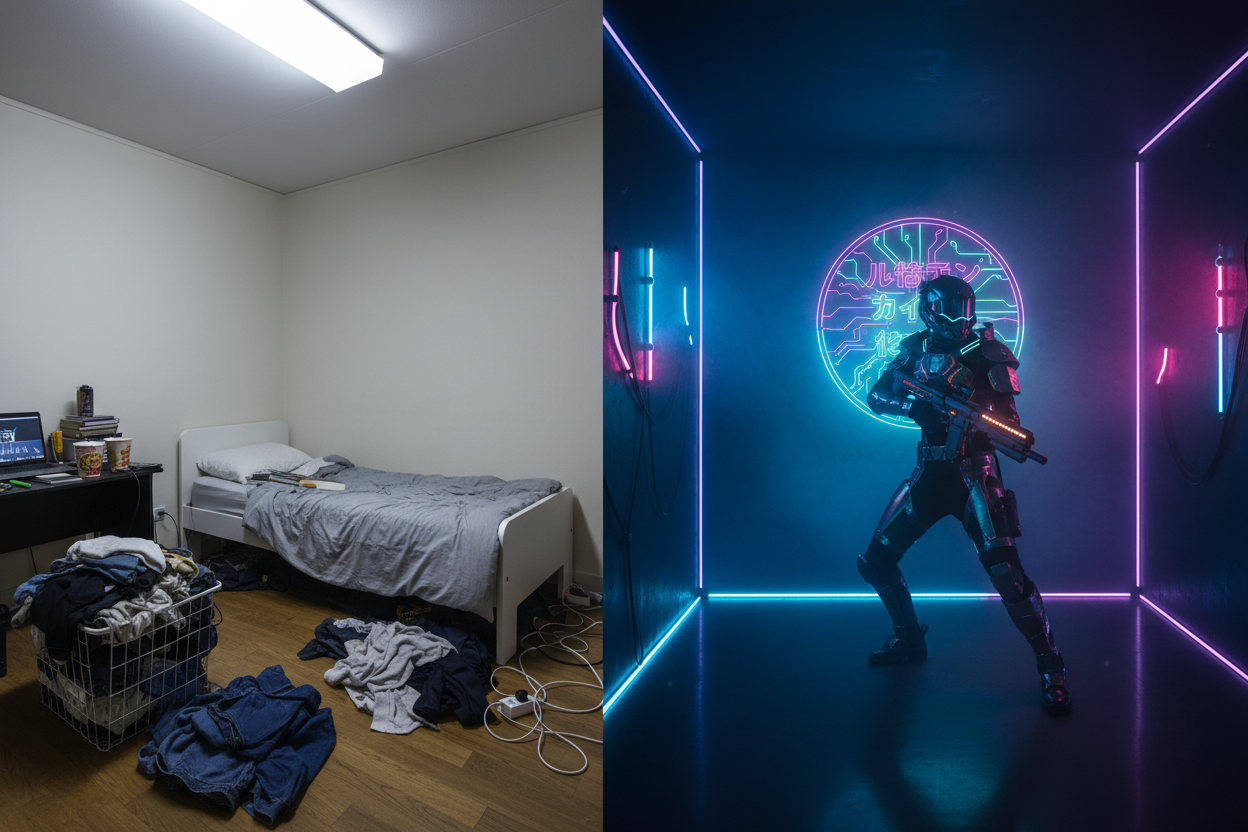
Some of the most-saved cosplay Reels on Instagram right now aren't shot in rented studios — they're shot in bedrooms and bathrooms barely big enough to turn around in. The format is simple and brutally effective: the first three seconds show a cramped, cluttered room with laundry on the floor and bad overhead lighting, then a hard cut at second four reveals a moody, cyberpunk-looking final photo that looks like it came out of a professional shoot. That contrast is exactly why these Reels get saved and shared at such a high rate — nobody expects a small bedroom to produce that result, so the reveal does the heavy lifting. This guide walks through exactly how to build that setup yourself, in one afternoon, without renting equipment or clearing out your entire room.
What you'll need:
-
An RGB light stick or two (battery-powered, color-adjustable — this is the single most important item on this list)
-
A portable fog or mist machine (small handheld models are inexpensive and widely available)
-
A [phone tripod or mini tabletop stand
-
A dark or neutral wall/corner to shoot against (a blackout curtain or dark bedsheet works if your walls are light-colored)
-
Optional: a second small light or lamp for a subtle fill, and a colored gel or cellophane sheet if you only have one white light source
Step One: Clear and Darken Your Shooting Corner
Before touching any lighting gear, pick the smallest, plainest corner of your room you can find — a blank wall, a closet door, or even a bathroom wall works better than an open space, because a tighter frame hides clutter more easily and gives light and fog something to bounce off of instead of dissipating into open air. Clear everything within the camera's frame: laundry, cords, furniture edges, anything that reads as "obviously a bedroom" once it's lit. You don't need to clean the whole room, only what the lens will actually see.
Next, kill as much ambient light as you can. Turn off overhead lights and close curtains or blinds, even during the day if needed. This step matters more than people expect: RGB lighting only reads as bold and saturated when it's the dominant light source in the frame. If daylight or a warm ceiling bulb is still filling the room, your colors will look washed out and pastel instead of rich and cinematic. If you don't have a dark wall to shoot against, pin up a dark bedsheet, blackout curtain, or even a large piece of black fabric — this single trick does more to sell the "studio" illusion than almost anything else on this list, since it removes visual clutter and gives your RGB light a clean surface to color.
Step Two: Position Your RGB Lighting for Contrast, Not Just Color
This is where most first attempts go wrong — people place one RGB light directly in front of the subject and wonder why the shot looks flat instead of dramatic. The trick professional-looking setups rely on is contrast between two colors, not just one bold color.
Place your main RGB light stick at roughly a 45-degree angle to one side of where you'll be standing or posing, not straight-on. Set it to a saturated color that fits the mood you're going for — deep blue, magenta, or purple work especially well for a cyberpunk or dark-fantasy feel. If you have a second light or lamp, place it on the opposite side at a lower intensity, set to a contrasting color (a cool blue paired with a warm magenta or red is a reliable combination). The goal is for the two colors to meet and blend across the subject's silhouette rather than flooding the whole frame in one flat wash — that blended edge is what reads as "shot in a real studio" rather than "phone flashlight with a colored filter." If you only have one light, you can fake a second color source cheaply by covering a small lamp or phone flashlight with a colored gel or even translucent colored cellophane and placing it as a rim light behind or beside the subject.
Keep your light sources visible in test shots before you commit — check your phone screen as you adjust angle and distance, since even a few inches of movement changes how the two colors blend. This is a five-minute trial-and-error process, not something you'll get right on the first placement.
Step Three: Add Atmosphere and Lock In Your Camera Settings
Once your lighting is set, this is where the fog machine does its job. A small burst of fog — not a thick, room-filling cloud — is what actually creates the glowing, dimensional look you see in the highest-performing versions of this Reel format, because fog particles catch and scatter the colored light in a way that flat air can't. Trigger a short burst a few feet from your shooting spot, angled so it drifts through the light beam rather than directly at the camera lens, and give it a second or two to settle into a light haze before shooting. Less is almost always more here — too much fog reads as smoke-machine-at-a-school-dance rather than cinematic atmosphere, and it can also fog up your lens or phone camera if you're shooting too close.
For the camera itself, set your phone on the tripod and switch to your phone's manual or "Pro" camera mode if it has one, then lock focus and exposure manually on your subject's position before you start posing — auto settings will constantly try to "correct" the saturated colors back toward normal, which flattens exactly the effect you're trying to create. If your phone doesn't have manual controls, tap and hold on the screen where you'll be standing to lock focus and exposure before stepping into frame. Shoot a few test frames with the fog and lighting both active, checking that neither element is overpowering the other, before doing a full take.
Common Troubleshooting and Mistakes to Avoid
-
The colors look washed out or pastel instead of bold. This is almost always leftover ambient light. Double-check that overhead lights are off, curtains are fully closed, and no daylight is leaking into the frame — even a small amount of white light will dull saturated RGB colors significantly.
-
The shot looks flat, like a colored flashlight rather than a studio look. This usually means your light is positioned too straight-on. Move it to a stronger side angle, and if possible, add a second contrasting color from the opposite side rather than relying on one light source alone.
-
The fog isn't visible in the shot, or it's too thick and hazy. Fog needs light to pass through it to be visible — if it's not catching the light, move your light source closer to where the fog drifts, or angle it so the beam cuts directly through the haze. If it's too thick, use shorter bursts and give it a few extra seconds to thin out before shooting; fog also settles differently depending on room airflow, so a slightly open door or a small fan on low can help control density.
-
Your phone keeps refocusing or auto-adjusting exposure mid-shoot. This is almost always an auto-mode issue — lock focus and exposure manually before you start posing, and avoid touching the screen again once it's locked, since a stray tap can trigger the camera to "correct" itself back toward flat, neutral lighting.
-
The room still looks small or cluttered even with good lighting. Tighten your frame further. A close, chest-up or waist-up crop hides far more of the room than a full-body shot, and darkness plus fog naturally obscures depth, which works in your favor — you don't need to see the edges of the room for the shot to feel expansive.
-
Smoke detectors or alarms triggering. Portable fog and mist machines made for photography use water- or glycol-based fluid, not smoke, but sensitive detectors can still occasionally react. Test a small burst first, keep the machine a reasonable distance from any detector, and crack a window or door slightly if your room has a particularly sensitive alarm.
Next Steps
Once you've got a shot you're happy with, the reveal format itself matters as much as the photo — cut from a few seconds of the plain, cluttered "before" shot straight into your finished, lit result, since that contrast is what makes this style of Reel perform well in the first place.
From here, experiment with different color pairings for different moods (icy blue and white for a winter-fae look, deep red and purple for villain-glam), and consider building a small, permanent corner of your room dedicated to this setup so you're not rebuilding it from scratch every time.
If you're ready to invest a bit further, check out our guide to choosing the right portable RGB light stick for small spaces, and our roundup of compact fog machines that won't overwhelm a bedroom-sized shoot.

Dejar un comentario
Este sitio está protegido por hCaptcha y se aplican la Política de privacidad de hCaptcha y los Términos del servicio.