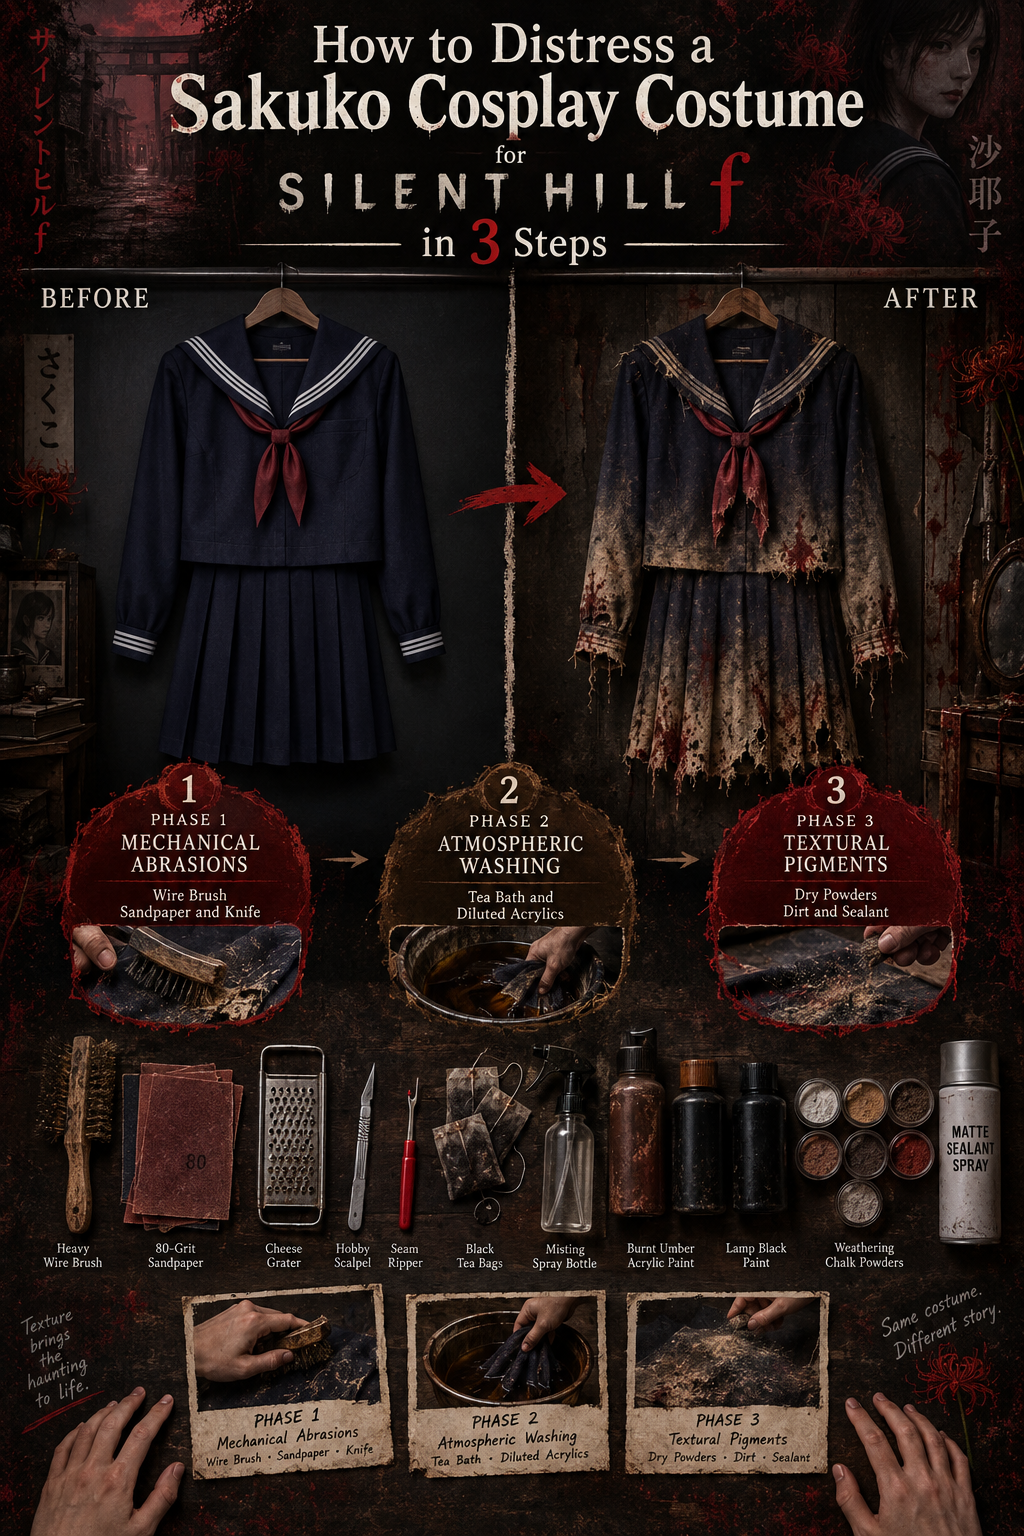
Transforming pristine, freshly sewn garments into a distressed masterpiece requires deliberate, layered cosplay weathering techniques. In official creator collaborations like Konami’s sponsored cosplay tutorial campaign for Silent Hill f, breaking down high-quality fabrics adds dramatic atmospheric depth that sets professional horror builds apart.
Tutorial Goal & Preparation Checklist
This guide details how to distress cosplay costumes step-by-step to achieve the eerie, aged look of Sakuko Igarashi. Complete the mechanical shredding, color washing, and pigment detailing within 4 to 6 hours of work time.
                   [ SAKUKO DISTRESSING WORKFLOW ]

  +---------------------------------------------------------------+
  | Phase 1: Mechanical Abrasions  --> Wire Brush, Sandpaper & Knife|
  | Phase 2: Atmospheric Washing   --> Tea Bath & Diluted Acrylics |
  | Phase 3: Textural Pigments     --> Dry Powders, Dirt & Sealant  |
  +---------------------------------------------------------------+
Required Cosplay Weathering Supplies
-
Mechanical Breakdown Tools: Heavy wire brush, 80-grit & 120-grit sandpaper, cheese grater, seam ripper, hobby scalpel.
-
Dyes & Wash Liquids: Black tea bags, fabric dye (dark brown/olive green), acrylic paints (burnt umber, lamp black, raw sienna), misting spray bottles.
-
Textural Pigments: Weathering chalk powders, fabric texturizing medium, matte clear sealant spray.
-
Safety Equipment: Dust mask / respirator, nitrile gloves, drop cloth, well-ventilated workspace.
Step 1: Mechanical Abrasions & Structural Fabric Breakdown
Before applying any paints or liquid stains, you must physically break down the smooth factory weave of your Sakuko cosplay garment. Real environmental wear occurs along friction points—hems, cuffs, collars, and knees.
         [ HIGH-FRICTION DISTRESSING TARGET ZONES ]

              ( Sleeve Cuffs & Elbow Seams )
                           |
            [ Collar & Shoulder Pleats ]
                           |
              ( Garment Hem & Side Seams )
-
Fray Hems and Edges: Take a seam ripper and pick out key hem threads along the bottom of the top and skirt. Drag an 80-grit sandpaper block vigorously along edge seams to create frayed, feathered threads.
-
Scrape High-Wear Surfaces: Use a heavy wire brush in rapid, downward strokes across knees, elbows, and shoulder seams. This raises fabric pile and softens synthetic fibers so liquid washes absorb evenly later.
-
Add Micro-Tears: Hold a hobby scalpel at a 45-degree angle to score small, horizontal micro-cuts into outer fabric layers. Avoid cutting through structural stress seams to prevent entire panels from unraveling during convention wear.
Step 2: Atmospheric Tea-Staining & Grime Wash Layers
Learning how to weather cosplay clothing effectively requires building color up in subtle translucent layers rather than applying heavy opaque paint in a single pass.
-
The Tea-Stain Base Pass: Submerge the entire fabric outfit in a hot bath of concentrated black tea or diluted tan fabric dye for 30–45 minutes. This strips away the bright "brand-new" white tone, giving the cotton or polyester an aged, antique parchment undertone.
-
Spraying Grime Gradients: Fill a misting spray bottle with a diluted mixture of 1 part burnt umber acrylic paint, 1 part lamp black paint, and 10 parts water. Hang the garment up and spray heavily from the bottom hem upward, creating a natural gradient where environmental grime builds up near the floor.
-
Mottled Water Spots: While the spray pass is still wet, flick clear water droplets across the fabric using a stiff bristle brush. The water drops push the pigment outward, forming realistic, splotchy water marks and ring stains as it dries.
Step 3: Targeted Blood, Mold & Dirt Pigment Detailing
The final stage of this Silent Hill f Sakuko cosplay tutorial focuses on localized horror detailing—adding damp rot, dried blood, and ingrained ground dirt around seamlines.
                 [ LAYERED COLOR PIGMENT MATRIX ]

  +---------------------------------------------------------------+
  | Under-Layer : Tan Tea Stain (Base Fabric Aging)              |
  | Mid-Layer   : Burnt Umber & Olive Spray (Environmental Dirt)  |
  | Top-Layer   : Dark Crimson & Black Paste (Blood & Mold Rot)   |
  +---------------------------------------------------------------+
-
Seam Deepening: Dip a dry stencil brush into raw sienna and dark brown weathering chalk powders. Buff the powders directly into deep seams, buttonholes, and collar folds to create shadows and simulate years of accumulated grime.
-
Applying Wet-Look Blood & Rot: Mix dark red acrylic paint with a drop of green paint and glossy textile gel medium to produce a thickened, dark blood/decay paste. Dab this mixture around frayed cuts using a sea sponge, concentrating color near damaged areas.
-
Sealing the Weathering: Once dry to the touch, suspend the garment in a ventilated area and apply two light coats of matte clear fixative spray. This locks in raw weathering powders and acrylic washes, preventing paint transfer onto props or other cosplayers during events.
Troubleshooting & Common Pitfalls
Even experienced makers encounter challenges when executing cosplay costume aging techniques. Reference this guide to resolve common mistakes quickly:
| Problem | Root Cause | Immediate Fix |
| Fabric Feels Stiff / Board-Like | Concentrated acrylic paint applied without fabric medium | Rub dried areas vigorously over a hard wooden edge or brush lightly with a fine wire brush to break paint crust. |
| Distressing Looks Flat / Unrealistic | Used single dark color (e.g., pure black paint) | Layer lighter tan and olive tones beneath dark spots to create natural color depth. |
| Tears Unraveling Too Fast | Cut directly through primary structural seams | Apply clear fray-check glue along the back of vulnerable seam threads to halt further tearing. |
| Paint Rubbing Off on Skin / Undergarments | Omitted final matte clear fixative coat | Heat-set dry acrylics with an iron (use a press cloth) and seal with matte fabric sealer spray. |
Next Steps & Crafting Extensions
Mastering cosplay distressing techniques opens up incredible creative possibilities for horror, post-apocalyptic, and historical builds. Apply these same principles to props, wigs, and footwear to maintain a cohesive visual standard across your entire character.
![Top 3 Essential Tools for Wuthering Waves Qiuyuan Cosplay & Performance Transformation [2026]](http://www.cosplayreal.com/cdn/shop/articles/cover-wuthering-waves-qiuyuan-cosplay-italian-accent-transformation-split-bamboo-forest-stoic-swordsman-vs-creator-studio-ring-lights-italian-pinched-gesture-three-tool-cards-costume.png?v=1790511192&width=1024)

Hinterlasse einen Kommentar
Diese Website ist durch hCaptcha geschützt und es gelten die allgemeinen Geschäftsbedingungen und Datenschutzbestimmungen von hCaptcha.