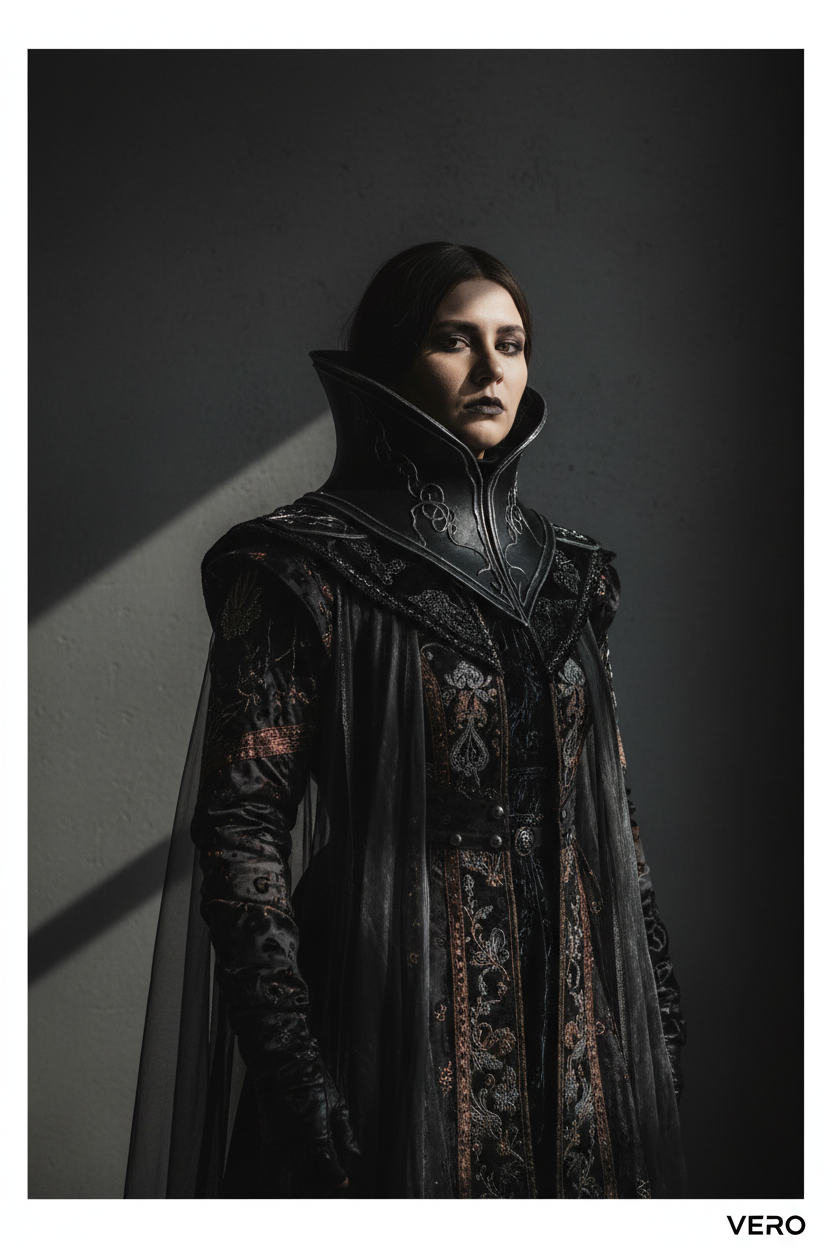
Instagram's algorithm has been shifting hard toward clean, magazine-quality imagery — carousel posts and Reels that look like they belong in a fashion editorial are consistently outperforming the heavily composited, green-screen-and-special-effects style that used to dominate cosplay content. Photographers and stylists tracking 2026 fashion photography trends point to the same shift industry-wide: minimalism that feels tactile rather than sterile, single-source lighting that sculpts rather than floods, and a renewed focus on texture — fabric, leather, skin — over digital effects.
The good news for cosplayers is that this look doesn't require a studio, a lighting rig, or expensive gear. It requires one good light source, a plain background, and a shooting plan. Here's exactly how to get there in a single afternoon.
What you'll need:
-
One light source — either a single window with strong, indirect daylight, or one continuous light or softbox if shooting indoors after dark
-
A plain wall, dark backdrop, or any uncluttered negative-space background
-
A camera or smartphone with manual/Pro mode controls
-
A tripod (optional but helpful for consistency across shots)
-
A reflector or a large piece of white foam board, to bounce light back into shadows
-
A clip-on macro lens if shooting on a phone, or your camera's macro/close-focus setting
-
Your costume ready to go, ideally with a limited, cohesive color palette rather than many competing colors
Step One: Set Up Single-Source Rembrandt Lighting
The single biggest visual difference between "cosplay photo" and "editorial cosplay photo" is lighting shape, not gear quality. Position your one light source — window or lamp — at roughly a 45-degree angle to your subject's face, slightly above eye level. This classic setup, known as Rembrandt lighting, is the foundation of the cinematic, high-fashion portrait look currently dominating editorial photography: it creates one lit side of the face, one shadowed side, and a small triangle of light on the shadowed cheek just under the eye. If you're shooting near a window, dusk or an overcast day actually works better than harsh midday sun, since diffused light wraps more naturally around fabric and skin instead of creating hard, flat highlights.
Place your reflector or white foam board on the opposite side from your light source, angled to bounce a small amount of light back into the shadowed side of the face — enough to keep detail visible in the makeup and costume texture on that side, without flattening out the shadow entirely. The goal isn't even, shadowless lighting; it's controlled contrast. That contrast is what separates a flat, evenly-lit snapshot from something that reads as intentional and editorial.
Step Two: Shoot Your Wide and Medium Editorial Frames
With your lighting set, shift to camera settings that support the mood rather than fighting it. If your camera or phone has manual controls, set your aperture as wide as it will go (f/2 or lower if your lens supports it) to create soft background separation, and underexpose slightly — roughly two-thirds of a stop below what your camera's meter suggests. This keeps shadows rich and deep rather than washed out, which is a defining trait of the current editorial look compared to the brighter, more evenly lit style that was standard a few years ago.
For posing, favor stillness and control over dynamic action shots at this stage — a slow turn of the head, a deliberate hand placement, weight settled into one hip. High-fashion editorial photography reads as intentional specifically because nothing in the frame looks accidental. Use your background's negative space deliberately: don't feel obligated to fill the frame edge-to-edge with detail. A plain wall with your subject positioned slightly off-center, with visible empty space on one side, does more to sell an editorial feel than a busier, tightly cropped composition. Shoot a range of these — a few full-length frames, a few from the waist up, a couple of tight shoulders-and-face frames — since a strong editorial carousel post typically mixes distances rather than repeating the same crop across every slide.
Step Three: Capture Macro Texture and Detail Shots
This step is what makes the difference between a good editorial photo and a genuinely luxury-feeling one. Switch to your macro lens attachment (or your camera's close-focus mode) and shoot tight, several-inches-away close-ups of the details that took the most effort to make: stitching lines, leather grain, the way patterned fabric catches light, jewelry clasps, and makeup detail like a precise eyeliner wing or a glossy lip. Unlike your wide editorial shots, these work best under slightly higher aperture (around f/4 to f/5.6) so the detail stays sharp rather than blurring into shallow depth of field — the goal here is clarity, not mood.
Keep your same single-source lighting setup for these shots rather than switching to flat, even lighting; a raking light angle across fabric texture or leather grain is what makes the material actually look tactile in a photo, versus lying flat and lifeless under front-on light. These macro shots are what current fashion photography trend coverage describes as material storytelling — treating fabric and texture as the subject in their own right, not just a backdrop for a pose. On Instagram specifically, these detail shots also perform well as connective slides in a carousel: a wide editorial shot, followed by a macro texture close-up, followed by another wide shot, creates the kind of rhythm that keeps people swiping through the full post instead of stopping after the first image.
Common Troubleshooting and Mistakes to Avoid
-
The lighting looks flat instead of sculpted. This almost always means your light source is too close to head-on. Move it further to the side until you can clearly see the Rembrandt triangle of light on the shadowed cheek — if you don't see that small triangle, the angle isn't steep enough yet.
-
Shadows look muddy or lose detail entirely. Your reflector or fill card isn't doing enough work. Move it closer to the shadow side, or use a larger piece of white board — you want just enough bounce to keep detail visible, not to eliminate the shadow.
-
Colors look washed out or your underexposed shots just look dark instead of moody. This is usually a white balance issue rather than an exposure issue. Manually set your white balance to match your light source (daylight setting for window light, tungsten or custom for indoor bulbs) rather than leaving it on auto, which tends to fight against intentional color grading.
-
Macro detail shots come out blurry. This is almost always camera shake at close focusing distances, where even small movements are magnified. Brace your elbows against your body, use a tripod if you have one, or bump your shutter speed up rather than relying on a wider aperture alone.
-
The photos still look like "cosplay photos" rather than "editorial photos" even with good lighting. This usually comes down to posing energy and composition rather than gear. Slow down — fewer, more deliberate poses outperform a large volume of casual shots, and resist the instinct to fill the frame; empty, controlled negative space is doing real work in the images you're trying to emulate.
-
Colored costume fabric is throwing an odd color cast onto skin. Strongly saturated fabric near the face (especially reds, deep blues, or neon tones) can reflect color onto skin under close, single-source lighting. Increase the distance between the fabric and the face slightly where your pose allows, or plan a small white balance or color correction pass in editing to neutralize the cast without dulling the fabric's own color.
Next Steps
Once you've got your set of wide editorial shots and macro texture close-ups, sequence them into a single Instagram carousel rather than posting them as isolated single images — alternating a full-length or medium shot with a texture close-up tends to hold attention better than grouping all of one type together.
From here, experiment with tightening your color palette even further across the whole shoot (a monochromatic costume and backdrop combination often reads as more luxury than a busier, multi-color set), and consider building a small dedicated corner of your space with a semi-permanent light and backdrop setup so you're not rebuilding this from scratch every time.
If you want to go deeper, check out our guides on choosing fabrics with strong macro-photogenic texture and building a minimalist, editorial-friendly costume color palette.

Hinterlasse einen Kommentar
Diese Website ist durch hCaptcha geschützt und es gelten die allgemeinen Geschäftsbedingungen und Datenschutzbestimmungen von hCaptcha.