Introduction: Filling the Homemade Horror Void
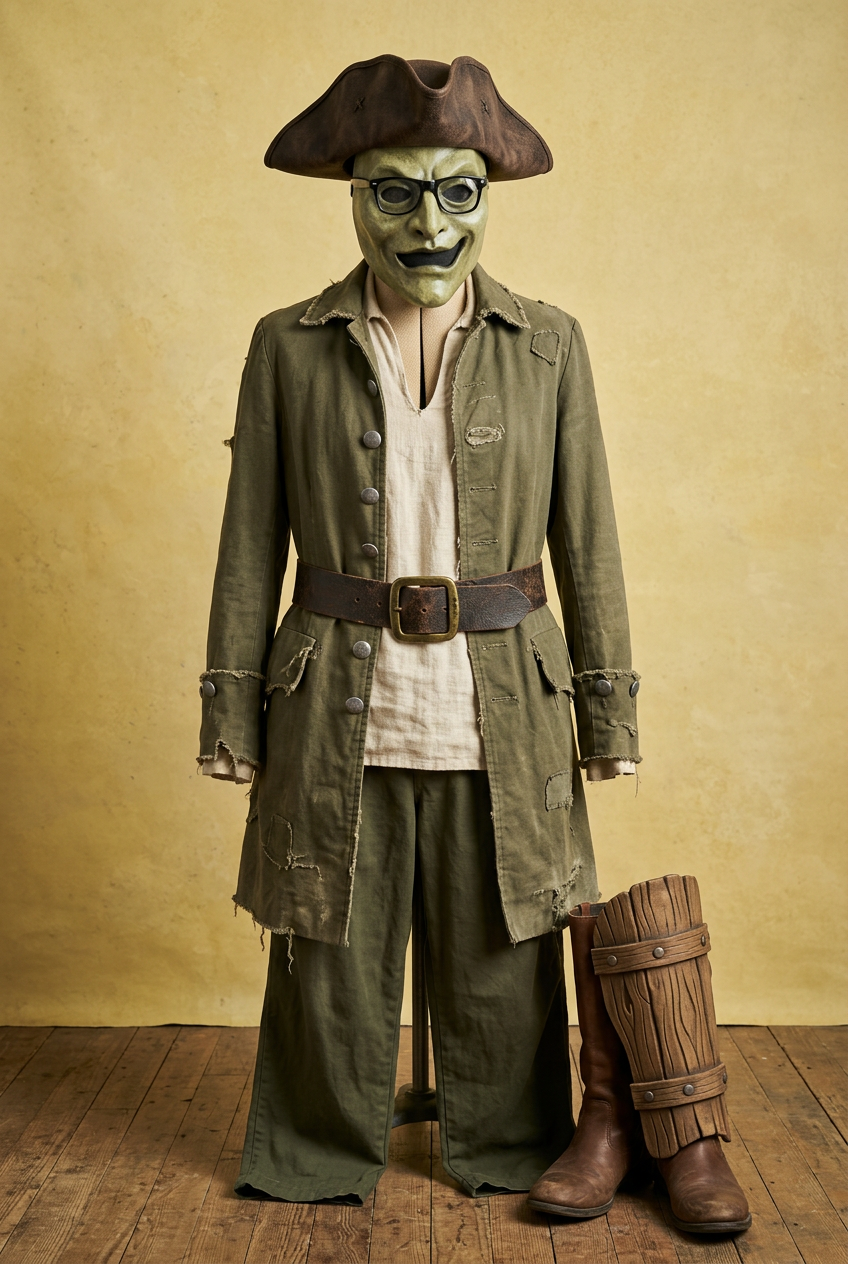
When fans realized commercial shelves only stocked Async hazmat suits, the community took matters into their own hands to build the iconic "Pirate Clark" entity from The Backrooms. Crafting a Captain Clark costume tutorial requires blending nautical pirate apparel with surreal analog horror elements.
Before assembling your build, gather your core crafting toolkit:
-
Sculpting & Base Materials: High-density EVA foam sheets, paper clay or air-dry foam clay, and acrylic paints.
-
Hardware & Optics: Black mesh fabric or dark tint film (for hidden eyeholes), hot glue, and flexible wire frames.
-
Apparel Base: A green or distressed yellow frock coat, loose trousers, a tricorn hat base, and DIY horror cosplay supplies.
Step 1: Sculpting and Modifying the Captain Clark Mask
The defining feature of any Captain Clark cosplay is the distorted, unsettling head structure.
-
Build the Base Shell: Form an inner helmet structure using EVA foam strips or paper-mâché to fit your head dimensions comfortably.
-
Sculpt the Facial Features: Apply air-dry foam clay over the shell to build out Clark's asymmetrical jawline, distressed skin texture, and mouth cavity. Follow a specialized Captain Clark mask making tutorial to capture the proportions.
-
Paint and Seal: Prime the clay with mod podge, then layer muted skin tones, olive undertones, and dark washes with acrylic paint.
Step 2: Tailoring the Tricorn Hat & Outfit Layers
Executing an authentic Pirate Clark costume DIY build requires combining distressed nautical garments with uncanny entity detailing.
-
Modify the Tricorn Hat: Take a standard felt tricorn hat base and cut wire notches into the brim to match Clark's tattered look. Age the fabric using tea staining or watered-down black acrylic paint.
-
Weather the Coat and Tunic: Sand down the cuffs and hemline of a green frock coat to create frayed edges.
-
Add Entity Markings: Spray subtle dark gradient weathering along the shoulder line to simulate lore-accurate decay seen across Backrooms cosplay builds.
Step 3: Crafting the Peg Leg & Glasses Integration
Conquering complex mechanical props turns a standard outfit into a convention-stopping DIY horror costume.
-
Build the Lightweight Peg Leg: Sleeve a sturdy PVC pipe inside a carved foam block, shape it to resemble a weathered wooden post, and paint it with faux wood-grain textures. Secure it over your boot using hidden leather straps.
-
Solve the Glasses Fit: To wear prescription glasses inside the mask, cut foam recessed channels inside the headpiece temples. Alternatively, wire external retro frames directly into the mask shell for a seamless Captain Clark peg leg and glasses fix.
Troubleshooting & Common Pitfalls to Avoid
-
Zero Mask Visibility: The mouth and eye region is notoriously difficult to navigate. Hide your actual line of sight behind dark speaker-cloth mesh inside the deep mouth or shadow recesses so you can see out while keeping your face invisible.
-
Mask Overheating: Air-dry clay traps heat rapidly. Drill hidden ventilation holes behind the hat brim or near the ears to allow air circulation during long convention walks.
-
Unstable Prop Weight: If you opt for a 3D printed Captain Clark costume head or prop set, keep wall infill low (10–15%) to prevent neck strain.
Conclusion & Next Steps
Learning how to make a Captain Clark costume empowers you to bring one of the internet's most unique horror entities to life without waiting on commercial restocks. Stock up on essential DIY horror cosplay supplies today and start building your custom creation!
To see how creators approach sculpting entity masks and props from The Backrooms universe, you can check out this Captain Clark Clay Sculpture Tutorial. This step-by-step video demonstrates how to translate the character's facial proportions and textures using sculpting clay.


Leave a comment
This site is protected by hCaptcha and the hCaptcha Privacy Policy and Terms of Service apply.