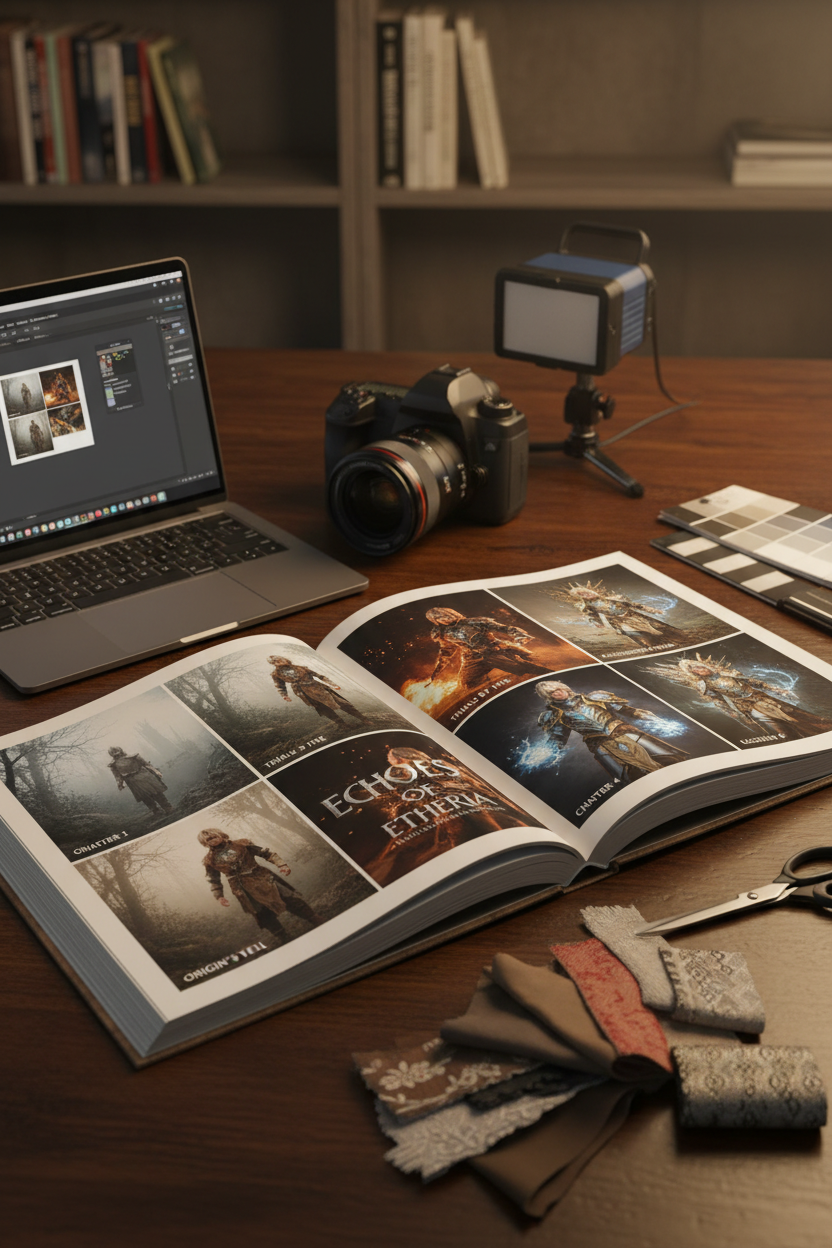
Transforming cosplay photography from single, quick-scroll social media posts into a physical, magazine-quality cosplay photo book allows creators to tell complete character stories. Instead of relying on one-off viral impressions, building a narrative cosplay visual storytelling project documents a character's journey across distinct narrative chapters.
Pre-Production Checklist & Required Tools
Before starting your self-published cosplay photobook, gather these core project planning assets:
-
Narrative Outline & Shot List: A chapter-by-chapter script mapping the character's emotional arc.
-
Photography & Lighting Gear: High-resolution camera body (24MP+ recommended for print DPI), versatile prime lenses, and portable strobes.
-
Wardrobe Variations: Sequential outfits or themed cosplay costume sets reflecting different eras or emotional states of the character.
-
Layout Design Software: Adobe InDesign, Affinity Publisher, or Canva set to CMYK color mode.
-
Print-on-Demand (POD) Platform: Blurb, Mixbook, or a trusted local digital press for physical fulfillment.
Step 1: Map the Character Arc and Shot List
A narrative photobook differs from a simple photo album by following a clear storytelling framework rather than a random collection of images.
                      [ NARRATIVE PHOTOBOOK STRUCTURE ]
                                     │
     ┌───────────────────┬───────────┴───────────┬───────────────────┐
     ▼                   ▼                       ▼                   ▼
Chapter 1: Origin   Chapter 2: Trial       Chapter 3: Climax   Chapter 4: Legacy
- Rural/Low-key     - Intense lighting     - High-contrast     - Majestic posing
- Muted wardrobe    - Battle weathering    - Full armor/effects - Editorial spread
-
Define Chapter Milestones: Divide your character's storyline into 3–5 distinct chapters (e.g., origin, rising conflict, peak transformation, and epilogue).
-
Draft a Visual Script: Assign specific camera angles, expressions, and lighting moods to each chapter. Alternate between wide environment shots, medium action poses, and intimate macro details.
-
Calculate Page Allocation: Plan for 24 to 48 total pages, assigning spread layouts (two facing pages) to major plot points to maintain rhythm.
Step 2: Execute Multi-Location Shoots and Wardrobe Shifts
Executing compelling character storytelling photography requires matching real-world locations and costumes to the character's progression.
-
Match Environments to Story Eras: Transition location choices along with the narrative arc (e.g., starting in natural, muted outdoor spaces before moving into grand indoor sets or gritty urban ruins).
-
Coordinate Costume Evolution: Use distinct variations or modular adjustments across your themed cosplay costume sets—such as adding battle damage, weathering, or changing props—to visually signal growth between chapters.
-
Capture Editorial Fillers: Shoot texture details (close-ups of fabric weave, prop hilts, footsteps, or atmospheric landscapes) to use as background fills and page dividers during layout design.
Step 3: Design Editorial Layouts and Typography
To make your project look like a professional art magazine rather than a printed family album, apply clean graphic design principles.
| Design Element | Amateur Photobook | Professional Editorial Layout |
| Grid Alignment | Random placement, inconsistent margins | Strict 3-column or 4-column grid framework |
| Image Spacing | Edge-to-edge clutter on every page | Generous white space and deliberate empty margins |
| Typography | Generic system fonts, heavy drop shadows | Clean serif/sans-serif pairings with subtle tracking |
| Page Hierarchy | Equal image sizing across spreads | 1 dominant hero shot supported by 2–3 smaller details |
-
Set Up Print Bleed & Margins: Establish a 0.125-inch trim bleed and keep all critical visual elements inside a safe margin area.
-
Pair High-Impact Spreads: Place dynamic double-page hero shots next to minimalist text quotes or subtle lore excerpts.
-
Maintain Visual Rhythm: Avoid clustering high-energy action shots consecutively; alternate intense battle pages with quiet, atmospheric spreads to give the reader visual breathing room.
Step 4: Prepare File Exports and Self-Publish Print Runs
Converting digital RGB photos into physical ink on paper requires careful technical preparation to avoid color shifting or cropped details.
-
Convert to CMYK Color Space: Convert all final images from sRGB to CMYK (using SWOP or GRACoL color profiles) and adjust black point levels to prevent crushed shadows in physical printing.
-
Export at 300 DPI: Export your final layout as a press-ready PDF with printer crop marks enabled and all fonts embedded.
-
Select Paper Stock and Binding: Opt for 100lb+ coated luster or matte paper to prevent ink bleed. Choose layflat binding for full-bleed double-page spreads so key subject details are not lost inside the book spine.
Troubleshooting Common Photobook Pitfalls
Problem 1: Images Appear Darker and Muddy in Print
-
Cause: Editing on an uncalibrated, overly bright monitor using RGB space without soft-proofing for ink absorption.
-
Solution: Calibrate your monitor display brightness to 80–100 cd/m² and run a single test proof copy with your printer before committing to a full production run.
Problem 2: Crucial Subject Details Clipped by the Spine
-
Cause: Placing important visual elements directly across the center fold gutter without layflat binding.
-
Solution: Keep faces, logos, and critical prop details at least 0.5 inches away from the center fold line, or upgrade to a seamless layflat binding option.
Problem 3: Disjointed Visual Style Across Chapters
-
Cause: Inconsistent post-processing color grades across different shoot days.
-
Solution: Develop a unified color-grading LUT (Look-Up Table) or Lightroom preset stack for the entire project to maintain cohesive color balance across all chapters.
Bringing Your Story to Print
Creating a narrative-driven cosplay photo book bridges the gap between digital content creation and physical art collection. By treating your next project as a structured editorial publication—from early shot-list scripting to final print proofing—you preserve your craftsmanship in a permanent, high-value format.
Ready to plan your next character story? Explore our multi-era themed cosplay costume sets to outfit your character's progression, or check out our guide on Visual Storytelling Techniques in Cosplay Photography.

Leave a comment
This site is protected by hCaptcha and the hCaptcha Privacy Policy and Terms of Service apply.