In the Cyberpunk aesthetic, photography is not about capturing reality; it is about constructing a digital nightmare. The iconic "Edgerunner" look—saturated neons, deep blacks, and a sense of constant, underlying motion—is not achieved by simply pointing a camera at a sign. It is the result of Calculated Visual Engineering.
To transform your Lucy cosplay into a cinematic production, you must master the interaction between your subject, the artificial environment, and the camera’s sensor. This is the masterclass in cinematic lighting and post-production control.
🧭 The Photography Audit: Cinematic Standards
When shooting in the "Neon Zone," audit your session against these three technical pillars:
1. The High-Dynamic Range (HDR) Balance
Cyberpunk environments feature extreme highs (neon) and extreme lows (shadows). Your goal is to preserve data in both.
-
The Technical Target: Shooting in RAW format with underexposure compensation (-0.7 to -1.0 EV).
-
Why it Matters: Underexposing ensures you don't "clip" (blow out) the neon lights. Modern camera sensors excel at recovering detail from dark shadows, but once a light source hits white, that data is lost forever.
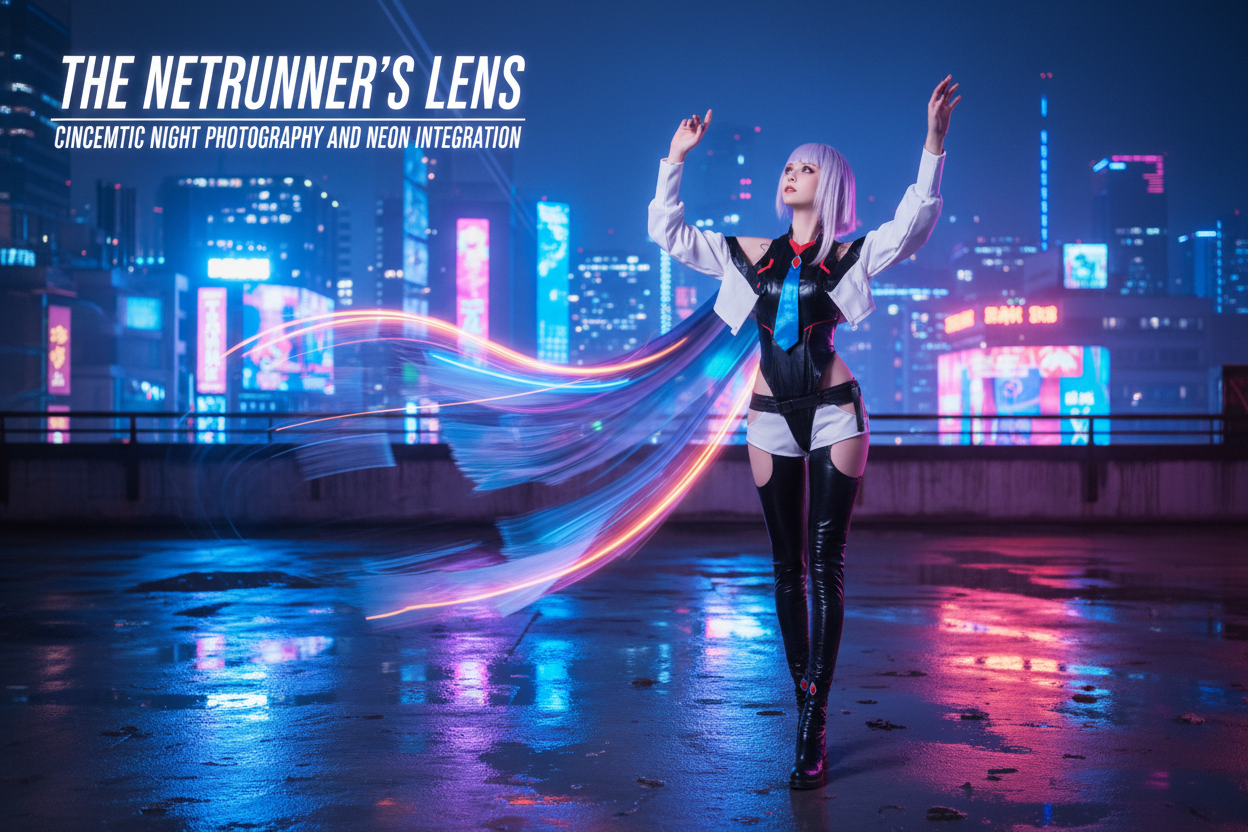
2. Motion and Velocity (Long-Exposure Trails)
Lucy is a runner; she exists in a state of flow. Static shots often fail to capture this energy.
-
The Technical Target: Shutter speeds between 1/15s and 1/2s, utilizing a tripod for stability.
-
Why it Matters: A slightly blurred background suggests movement, while the sharp focus on your cybernetic rig creates a visual contrast that highlights the character’s speed within a static frame.
3. Color Grading: The "Dystopian Palette"
The "cyberpunk look" is defined by specific color temperature shifts—typically cold, desaturated shadows contrasted with vibrant, punchy highlights.
-
The Technical Target: Shifting shadow tones toward teal/cyan and highlight tones toward magenta/hot pink during post-processing.
-
Why it Matters: This signature contrast creates the psychological "temperature" of a city that is simultaneously frozen and burning, grounding your performance in the genre’s visual language.
🛠️ The Photography Performance Audit
| Variable | Snapshot Approach | Cinematic Masterclass |
| Exposure | Auto (Flat) | Manual (-1.0 EV / RAW) |
| Motion | High Shutter (Frozen) | Long-Exposure (Motion Blur) |
| Color | Direct-from-Camera | Split-Tone Color Grading |
[Technical Expert Note]: Never use the camera's built-in flash. It flattens the texture of your PVC suit and ruins the atmospheric depth of the neon background. If you need more light on your face, use a dedicated, dimmable LED soft-panel set to 5% power.
💡 Practical Application: The "Night-Runner" Setup
To master the environment, execute these three tactical maneuvers:
-
The "Reflection" Scout: Look for wet surfaces—puddles, glass, or polished metal. The reflection of neon on the ground multiplies the light source, turning a simple street into a canvas of color. Position yourself so these reflections frame your silhouette.
-
The Aperture Trick: If you have multiple neon signs in the background, set your aperture to f/8 or higher. This turns every light source into a "starburst," which adds a professional, cinematic polish to the image.
-
The Focus Shift: If you are shooting with a partner, have them walk slowly behind you during a long exposure. This creates "light streaks" that emphasize the feeling of a city that never stops moving.
❓ Developer's FAQ
Q: Do I need a full-frame camera for this look?
A: Not necessarily. Even modern APS-C sensors can capture this aesthetic. Focus on your manual exposure settings and your post-production workflow; the "look" is in the light, not the sensor size.
Q: How do I remove noise from low-light shots?
A: Use AI-based denoise software (like Topaz or Lightroom’s Denoise AI). These tools are built for modern, high-ISO photography and can recover massive amounts of detail from "noisy" night shots.
Q: Can I edit this on a mobile device?
A: Yes. Apps like Lightroom Mobile or Darkroom offer professional-grade split-toning and tone-curve adjustments that are sufficient for achieving the cyberpunk palette.
🏁 The Final Frame
Photography is the final stage of your costume's lifecycle. It is where the engineering, the rigging, and the persona all converge into a single, immortalized frame. By mastering cinematic lighting and grading, you ensure that your work survives long after the event ends.
Don't just take a photo. Build a scene.
Leave a comment
This site is protected by hCaptcha and the hCaptcha Privacy Policy and Terms of Service apply.